|
|
26 June 2014
It's time to do some upgrade work on the Poole-era
Graham Farish suburban carriages to make them more LSWR-like (albeit
in SR livery and lettering). Fortunately there are quite a few
modelling aids for doing this sort of work, although it seems
strange that no one seems to have tried it before. At least, there
seems to be nothing online to say so.
There are a lot of problems with accuracy in the
Poole-era coaches (especially given the fact that they are closer
to LMS suburban carriages in their details than they are to any
LSWR carriages), but they'll do until someone produces a decent
range of bogie carriage LSWR kits.
The surgery won't involve anything drastic
like sawing a carriage in half and trimming its length (yet), but it
will involve creating new ends, probably fitting a roof, and adding
a lot of detail, but without damaging the lining which really can't
be replicated with a paintbrush, so here we go...
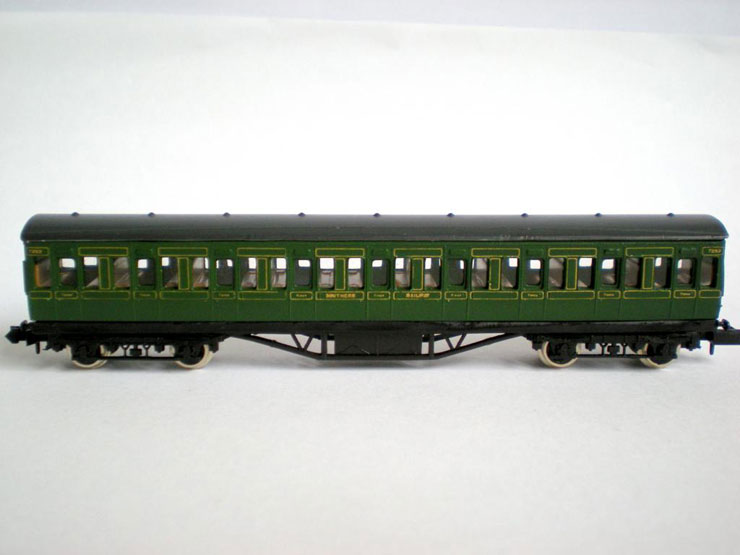
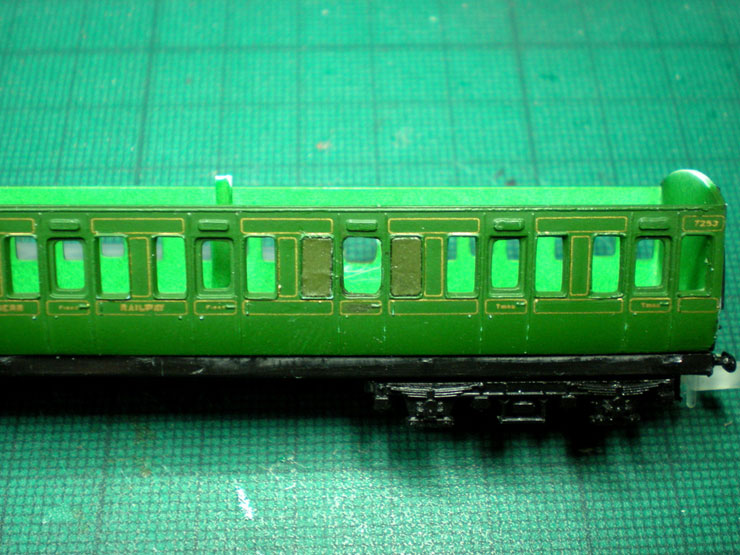
To start with, we have a Farish suburban composite
coach, side view:
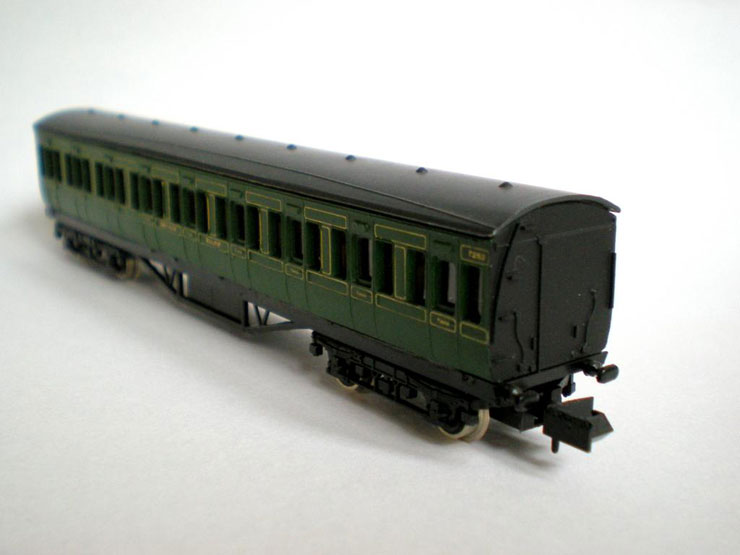
...and end view:
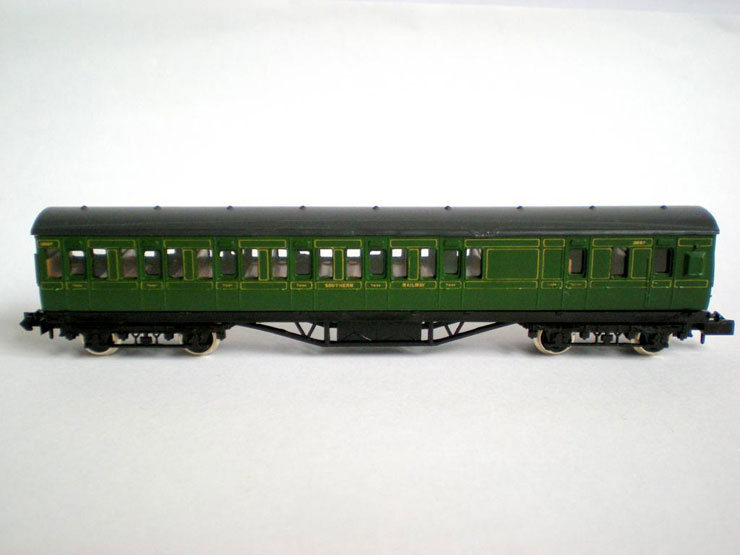
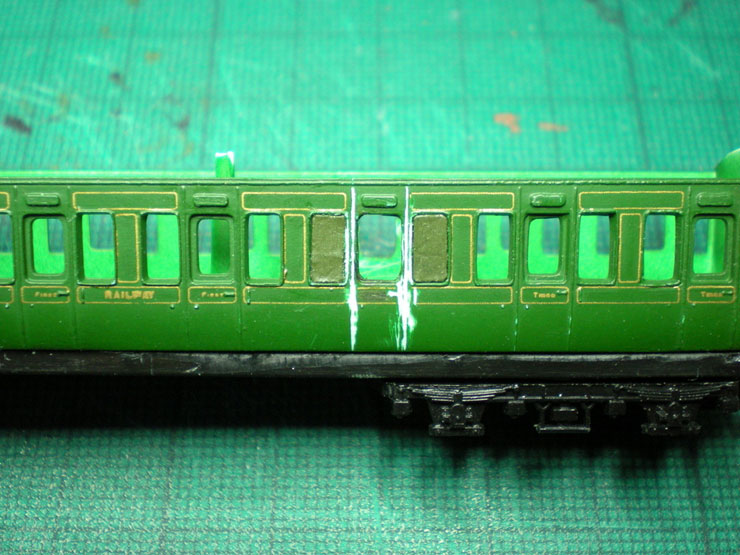
...and a Farish suburban brake third, side view:
...and end view:
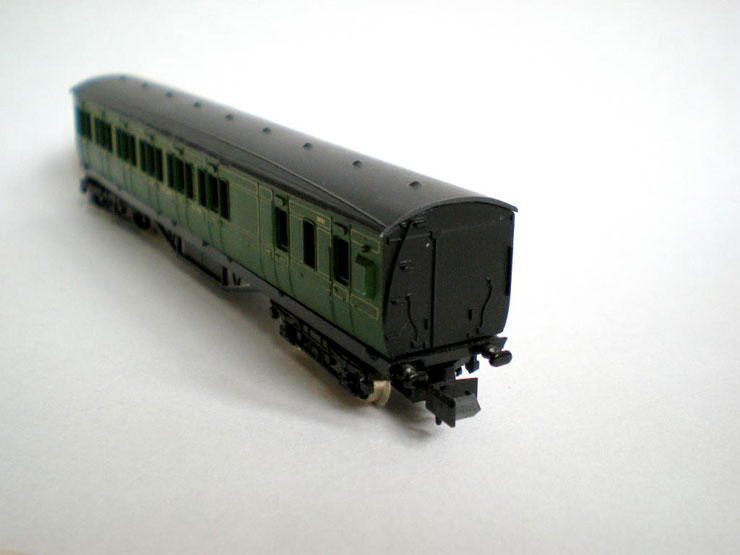
So these are the victims... I mean volunteers. At a little over 57ft
they'll do for matching up fairly closely to LSWR 56ft units of
1904-1910.
26 June 2014
Here's what I propose changing, preferably without
having to do any repainting so that the lining can be preserved:
- Fix the roof and carriage ends to create a
proper LSWR roof profile
- Add Ultima roof vents to centre line of roof
(14 for coach, 9 for brake)
- Add carriage end detailing including grab
handles on roof and grab rails over steps
- Add white backing to lavatory window on
coach and brake
- Add Ultima door handles
- Add BH Enterprises vacuum pipes to each
carriage end
- Add Ultima round buffers to each carriage
- Add Ultima guard's lookout ducket on each
side, either to replace the old one or midway along
- Add closer coupling between cars of the same
unit by shortening one coupling per unit
- Remove some dynamos/battery boxes from
underneath the carriage
- Renumber each unit
So what's needed to do all of that?
- Fix the roof using plasticard? What thickness?
Wire for rainstrips?
- Roof vents = Ultima LNWR/BR Ridged Dome Vent
(Pack of 25) UM256?
- Carriage end panel detailing:
- Carriage ends = plasticard shaped to permit
the LSWR roof profile?
- Thin wire glued vertically to create that
panelled appearance so typical of pre-Grouping carriages?
- Thicker wire for pipes, grab rails on roof,
and curved handrails?
- Plasticard for steps?
- White backing to lavatory window on composite
and brake = paper or white paint
- Door handles = Ultima LSWR Grab Rails and
Door Handles (Pack of 250) UM336
- Vacuum pipes = BH Enterprises (Pack of 4)
BHE411 (ordered but awaiting confirmation)
- Round buffers = Ultima Oval Coach Buffers (Pack
of 4) UM103
- Guard's lookout ducket = Ultima LSWR Etched
Duckets (4 Pack) LSW97?
- Add closer coupling = cut down one coupling to
reduce length and glue back into position?
- Remove dynamos/battery boxes = drill out and
file, or remove entire section and replace with wire?
- Renumber each unit = SR carriage side numbers?
Some of the questions have been answered during
several hours of research and scribbling. And after some sourcing of
parts a final list of requirements was drawn up:
- Use either 0.2mm wire or printer paper for
rain strips
- Use Microstrip .010x.025 for cantrails along
the edge of the roof (rain gutters)
- Roof vents = Ultima LMS/LNER/SR Torpedo Vent
Plastic (Pack of 32) UM252
- Carriage end panel detailing:
- Carriage ends = strip detail off existing
ends and shape to LSWR roof profile (minor filling required)
- Add Black Brass Wire 0.2mm (50m) from
Luna Jewellery Cat 3011 (via eBay) to create panelled appearance
- Add 0.33mm handrail wire for pipes, grab
rails on roof, and curved handrails
- Use either card or thick paper for steps
- Paint white backing to lavatory window on
the transparent window strips
- Door handles = Ultima LSWR Grab Rails and
Door Handles (Pack of 250) UM336
- Vacuum pipes = BH Enterprises (Pack of 4)
BHE411
- Round buffers = Ultima LMS-Style Round
Coach Buffers (Pack of 4) UM103 (use UM103 oval for Emigrant stock)
- Guard's lookout ducket (larger than Farish
version) = Ultima LSWR Etched Duckets (4 Pack) LSW97
- Closer coupling = Shapeways clear couplers
(small shank when using original coach buffers)
- Remove dynamos/battery boxes = drill out
and file, and replace with 4.8mm x 4.8mm balsa boxes
- Renumbering each carriage = Fox Transfers
Bulleid sheet FRH 2404
- Replace pizza-cutter wheels = BR Lines 7.0mm
Wheels for Coaches - Solid Blackened (Pack of 4) GF2109-C
- Add set numbers = Fox Transfers SR Coaching
Stock Set Numbers (small) FRH2404/35
- Add seated passengers = Seated N Gauge
Passengers 1:150 Generic, from Everest, Cat P150S, via eBay
27 June 2014
I'm happy to make believe that these carriages are
56 footers so that I don't have to chop off bits (which would mean
buying the appropriate cutting instruments).
These two coaches will form a permanent two-car
set. The set numbers can be bought from Fox, but I haven't located
individual SR coach running numbers yet.
To my mind, the roof profile is one of the most
important things to change, along with adding the torpedo vents.
After all, it's the roof that will be seen most often when the
carriages are on the layout.
28 June 2014
There seem to be two viable options for the roof -
contact Etched Pixels or use card because it will be much easier to
shape than plasticard.
The existing shape is too flat at the corners
though. That weird LSWR roof shape demands a much squarer corner, so
card will probably be the way to go. Once the vertical strips,
pipes, steps, grab rails, rooftop handles, and vacuum pipes are
added it should look pretty good.
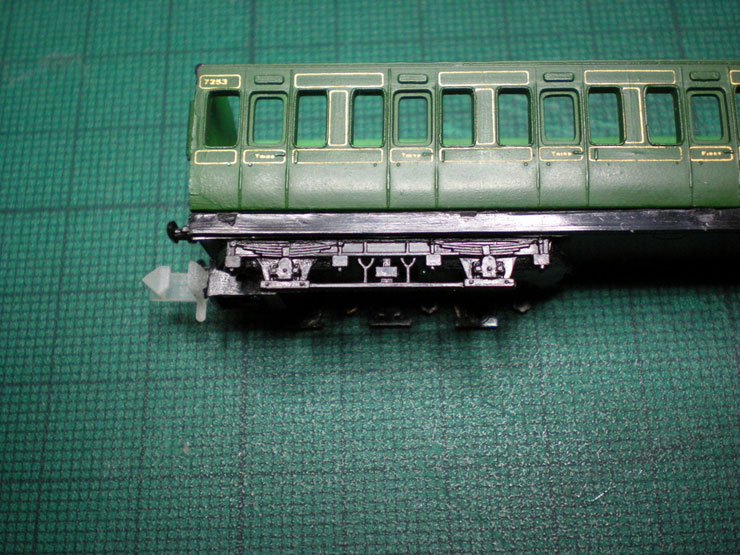
The lower bar needs to be snipped off each bogie. I
have no plans to swap out the actual bogies, but this is another
minor change that will help to make them look less like generic
Poole-era plastic coaches and more like the representative (in the
broadest sense) coaches that I'm aiming for. They'll never be
perfect (the doors and windows are marginally inaccurate for a
start), but they will look right to the average viewer, and they'll
look very much upgraded and amended as much as possible, which is
what's important.
The battery boxes on some coaches in each set need
to be removed, too. I'm wondering if drilling and filing is the best
way to do this. I think the roofs will be the most important, and
most noticeable change, but the rest will certainly help.
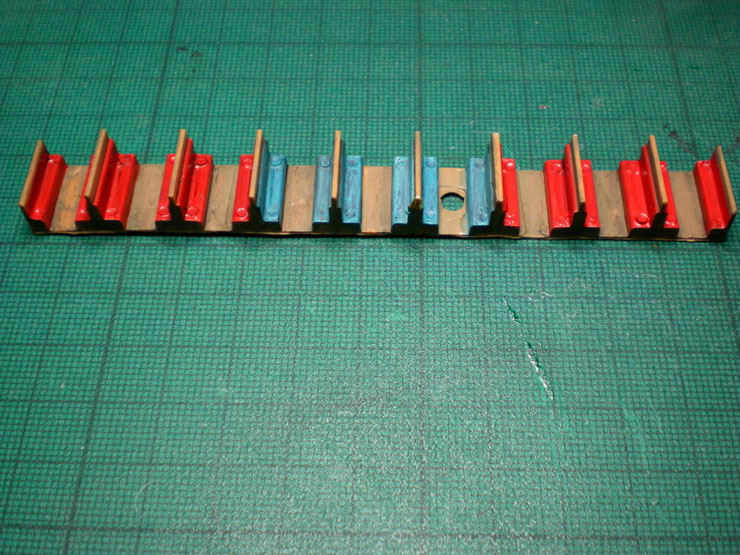
As for the seating, the Southern Railway seems to
use dark red for second class seating and blue/grey in first class.
10 December 2014
Believe it or not, it has taken since July to pull
all of the pieces together for this project, and now I'm too busy
with work and preparing an imminent publication on the
History
Files to be able to get started until after Christmas. Oh well,
at least I can go over all the parts. Many of these were the result
of recommendations from the NGF, so thanks are due here to everyone
who helped.
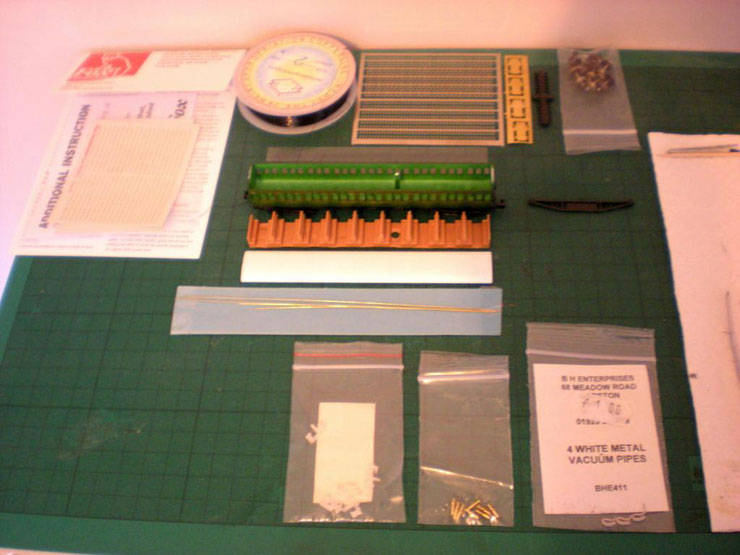
From the back, left to right are the following:
- SR Coaching Stock Set Numbers (small),
Fox Transfers, FRH2404/35
- Coach Numbering Metallic Gold, Fox
Transfers, FRH2013
- Black Brass Wire 0.2mm (50m) (for end
vertical strips), Luna Jewellery (via eBay), Code 3011
- LSWR Grab Rails and Door Handles
(Pack of 250), Etched Pixels, UM336
- LSWR Etched Duckets (Pack of 4, two
needed for the brake in this project), Etched Pixels, LSW97
- LMS/LNER/SR Torpedo Vent Plastic
(Pack of 32), Etched Pixels, UM252
- Replacement 7.0mm Wheels for Coaches
- Solid Blackened (Pack of 4), Etched Pixels, UM180
From centre back to front:
- Plastic glazing strips from the Farish
coach
- Emptied Farish shell, with one of the
battery boxes to the right
- Farish seats, ready to paint
- LSWR carriage roof, printed in 3D by
Etched Pixels, LSW96
- Brass handrail wire 0.33mm for
rainstrips and hand rails
Front, left to right:
- Semi-transparent Rapido couplers to
experiment with closer coupling, 3DR<.li>
- LMS-Style Round Coach Buffers (Pack of
4) , Etched Pixels, LSW97
- White metal vacuum pipes, BH Enterprises,
BHE411
Plus I need to source some plasticard or good quality
card for the end panels, end panel steps, and also a strip along the
top of the chassis to provide the missing running board on each side.
We're just about ready to go... possibly.
10 December 2014
The 'Luna Jewellery' pink/white/blue reel at the
back is actually black wire. I'm going to use that to provide the
vertical 'stripes' on the carriage ends:
27 March 2015
And we're off... finally.
Order of Works (See Southern Coaches Plate 121 &
LSWR Carriages of the 20th Century Figure 6.13 & Plates 6.12a-e):
Paint internal coach seats dark red for third class
and dulled blue/grey for third
Repaint brown wooden areas in brown and leave toilet section black
Add closer coupling between cars of the same unit by replacing with
shortest 3DR Rapidos
Bodywork (underframe)
- Remove dynamos/battery boxes from underneath every one carriage in
two, whether brake or non-brake
- Remove moulded dynamo boxes from other coach and tidy frame
- Clip off the lower bar on each bogie (keep for later)
Bodywork (end pieces)
- File or scrape off moulded detail on each end of carriage.
- Cut off old buffers
- Trim off about two millimetres from the roof's support (but not
the roof!), where it overlaps the carriage ends
- Gently file the old carriage end pieces to match the new roof
profile
- Drill through old buffer stubs so that Ultima buffers can be
fitted
- Drill an 0.8mm hole at the very centre of each buffer beam so that
it can house the vacuum pipe
- On the end furthest from where the roof grab handles will be,
drill four holes for two vertical hand
rails, about 1mm from each
edge:
- Two either side, just above centreline of the carriage windows
- Two either side, central to the panelling underneath the carriage
windows
- Attach Ultima buffers, rounded for some carriage types, oval for
others, filed a little on top and with a filed
slot into the
carriage base so that they sit level and straight before being
superglued in place (with a Bostik
mix for flexibility)
Bodywork (toilet and handles)
- Open up the window frame for the third door from the end for
toilet (the last third class door)
- File off toilet window door frame and also handle and grab handle
- Remove vertical gilt edging so that it can be joined up
horizontally along the entire section
- Add white backing to toilet window on either side carriage
- Use an old coach or wagon wheelset to make a positioning hole
immediately above and below old grab handles
- Drill each grab handle hole with an 0.5 bit
- Use old wheelset to place another positioning hole centred on each
of the old door handles
- Place seating strip and window strips back in place and re-drill
door handle holes
- Remove seats and strips and greatly enlarge those holes only (not
the holes in the bodywork) so that the
door handles will easily fit
into them
- Block up windows on either side of toilet window - use card cut to
shape, slightly rounded at the corners,
and painted before fitting.
- Strengthen blocked-up windows from behind by adding the
clipped-off bogie tie bars as vertical supports
Roof (and fitting parts together)
- Ensure roof fits snugly into position
- Add Ultima roof vents to centre line of roof, positioned laterally
over each compartment - (16 for coach, 9 for
brake), but not over
toilet 'compartment', using 1.0 drill bit, opening up hole a little
- Add smaller vent with 0.8 drill bit and use points motor throw bar
steel rod cut to 2-3mm lengths and rounded
at the end with a file)
over toilets, one one on either side of roof for each toilet
- Add Microstrip .010 x .020 as rain strips to roof, starting from
centre and working towards the ends
- Paint seated passengers
- Fit and lightly glue window strips into place
- Fit seating unit in place, and check that holes for door handles,
etc, can still be used (re-drill)
- Paint all door handle holes in Railmatch Light Olive Green mixed
with a touch of a golden yellow colour
- Paint filed-off door frame for toilet (Maunsell Green)
- Insert grab handles, and glue from the back where possible, or
insert a touch of glue into hole with a pin
- Insert door handles, and repeat glueing process
- Fix any damage to internal paintwork and seats caused by drilling
and sticking handles
- Touch up all green paint where needed
- Fill in any gaps in gold carriage lining using brass enamel paint
(correct errors with more Maunsell Green)
- Glue seated passengers into position
- Add new dynamo boxes under carriage body, behind tidied frame,
using squared Balsa (on one carriage in two)
- Add Microstrip .010 x .020 as cantrails to edges of roof
(guttering over each side of the carriage) - attach
with Bostik and then glue from underneath with superglue before
chamfering corners
- Add end grab handles on roof
- Undercoat roof to hide all pen guide lines (white or light grey)
- Wash roof in successive thinned layers of Railmatch Roof Dirt (or
dark grey) until satisfied with colour
- Scrape off old carriage numbers
- Renumber carriages
- Refit underframe (easier and safer to do before roof is fitted)
- Fit new roof, glue in place
- Fill gaps between roof and carriage ends
Fittings (end pieces)
- Cut out a templated end piece of paper and add five end vertical
strips to both of them
- When dry, secure in place on carriage ends, overlying old, filed,
detailing, & trimmed outside outermost strips
- Add pipework to one carriage end, furthest from the roof grab
handles:
- One 0.33mm brass rod cut to 17.5mm and with ends crimped flat,
then bend the ends to 90 degrees,
backwards, so that they can make
contact with the carriage ends (or close to it)
- Secure this in place, horizontally, level with the strip above the
window vents, just below cantrail level
- Cut a small squared piece from the discarded Farish moulded
battery boxes, roughly 1mm wide by 1.5mm long,
or close to it and
secure this centrally, immediately below the top horizontal bar and
touching it
- Add vertical hand rails to the same end, in the previously-drilled
holes, 1mm from each side edge, using brass
rod that is 4.5mm long
(excluding the L-shaped bent-over ends that fit into the drilled
holes)
- One 0.33mm brass rod cut to 12.0mm and with ends crimped flat
- Secure this in place, horizontally, centred against the vertical
hand rails on each side of it
- Cut two small rectangular pieces from the moulded battery boxes,
approximately 1mm high by 2mm long,
and secure these to the crimped
ends of the second horizontal bar (or one piece at one end and a
piece of
curved brass wire and a sliver of paper to mimic equipment
on some diagrams of coach
- Add vertical pipe centrally, cutting 0.33mm brass rod to 111mm and
crimping one end to climb over the central
horizontal rod so that it
touches the small squared box below the upper horizontal rod, and
continues down
from there to the buffer bar beam. Secure
- Add N Brass vacuum pipe over the vertical panelling strip after
bending the lowest section of the pipe into a
reversed L-shape -
insert this section into the previously-drilled central hole in the
buffer beam
- Add steps and rails to other carriage end, nearest the roof grab
handles:
- Add four new foot steps to the other carriage end (paper cut 2mm
high, folded in half into an L-shape, and
1mm wide, superglued so
that they harden), secure one side of L-shape to carriage end
- Add one new foot step above the other four (folded paper, 2mm
high, 6.5mm wide)
- Add stub of brass rod to previously-drilled holes, level with the
strip above the windows, protruding by about 1mm - these will
support the curved hand rails
- Create curved hand rails with two pieces of 0.33mm brass rod -
these should be straight for 6mm so that they
will rest on the stubs
at the 5.5mm mark and bent at the base so that they will slot into
the lower of the
handrail holes that are 1mm in from the side
- Now curve the rest of the hand rail brass rod gently to produce an
arc, bending at the top of the arc so that it
enters the drilled
hole just under the roof , about 1.5mm away from central vertical
panelling line, and also
secure them by gluing to stubs
- Add N Brass vacuum pipe over the vertical panelling strip after
bending the lowest section of the pipe into a
reversed L-shape -
insert this section into the previously-drilled central hole in the
buffer beam
- If necessary - add Ultima guard's lookout ducket on each side of
brake, to replace the old one
- Add running boards to each carriage side using paper, 1mm wide x
119.5mm long, glued to the underside of
the chassis edge line
- Undercoat any bared surfaces, including all end carriage detailing
- Touch up all green paint where necessary
- Touch up brass where necessary
- Touch up black areas where necessary
- Lightly varnish carriage ends, then add a touch of gloss varnish
so that carriage set numbers can be added
- Add carriage set numbers, centrally positioned on the upper
carriage ends, below the main step at that end,
but normally only on
brake ends of a set (LSWR Miscellany p35 - 1922, LSWR Carriages of
the 20th Century
p35 - 1937)
Varnish entire carriage where necessary
Lightly weather in layers so that dirt builds up in cracks and
doorways and on the carriage ends
Add new wheels to bogies
Done!
Now, this may be the final order of works list, but
it took all of the steps below to finalise it. So what you see below
here are all the steps listed above, but not necessarily in the
correct order.
10 April 2015
Progress has been slow to start with, mostly due to
some fine weather and lots of outside jobs. But there has been a
little progress.
Two coats of red acrylic, one coat of oil-based
Prussian Blue (S&DJR Blue, all I have) and a very dodgy oil/acrylic
mix to lighten it. Note to self, must mix oils with oils. The brown
has been repainted and the whole thing was given a wash of black to
tone it down:
Cut out the fake battery boxes from the frames.
There won't be any battery boxes on this carriage, but for next
time, I'll use square balsa wood for some standalone boxes to fit
behind the frame.
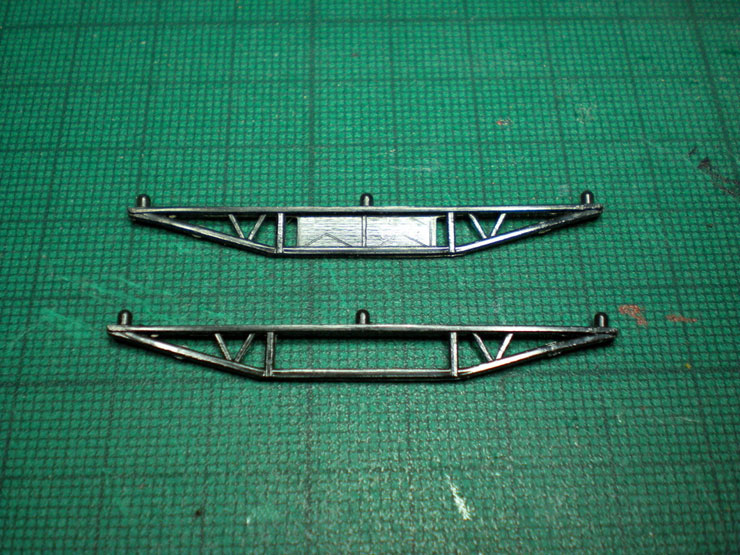
And then onto the bogies. Before:
...and after:
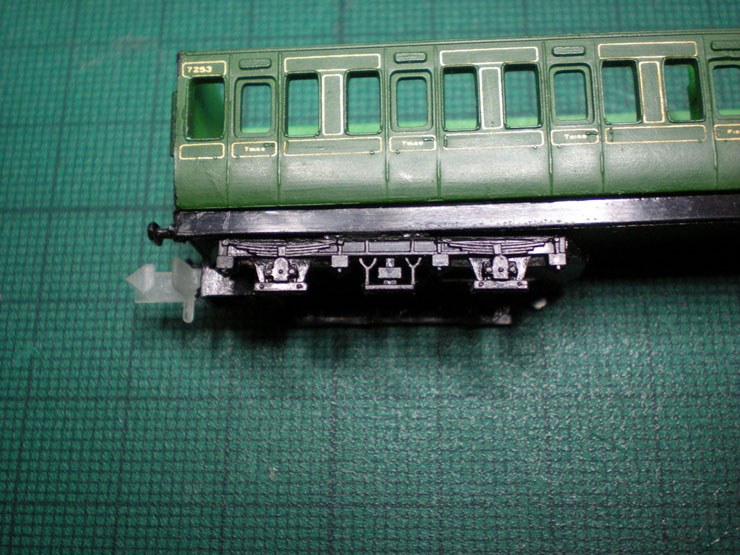
The trick is to hold the rather flexible bogie
frame near the middle. Then gently, and lightly, saw through with a
modelling knife. Each bar cuts through in only a few seconds and
they come off very easily.
That's it for now.
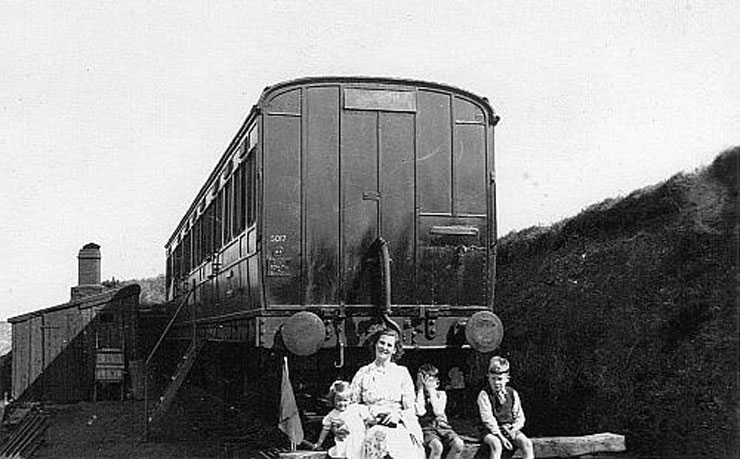
11 April 2015
Why put in all this work? Mostly because there's
nothing compatible available.
The new Dapol coaches (2015 release) are Maunsell
low window stock of 1926 onwards. But for anyone modelling the
pre-war period they're still pretty new and are used on premier
services. Most other services would still have used pre-Grouping and
early Grouping stock, which is why it's important to be able to make
these old Farish suburbans look better. They remained in service
right up until the 1950s, so this work is valid for just about any
steam period.
20 April 2015
Time for an update.
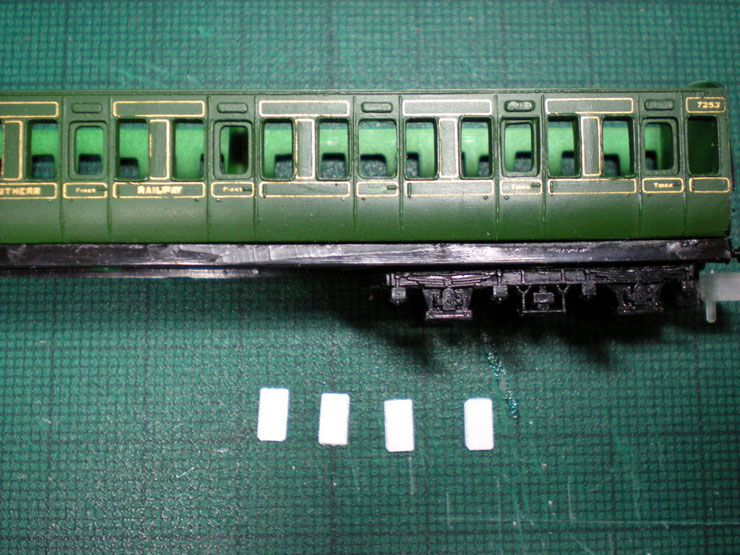
After painting the seats and then filing off the
droplight framing in the third door from the end (see below), I
suddenly also realised that I'd have two side windows that would
show seats in a toilet! Some hurried blocking-in was arranged. I
tried plasticard, but what I have here is too thick and wouldn't
file to a straight edge, so I went back to my personal favourite -
card:
I also painted in the white toilet window frosting:
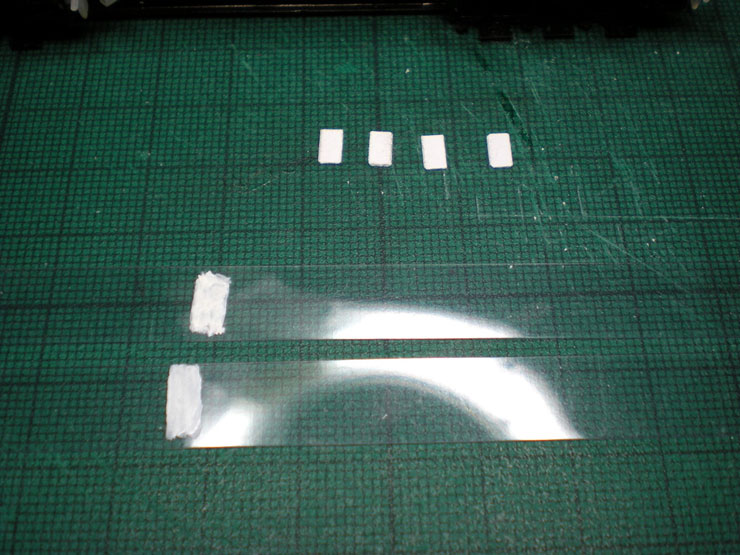
Then I undercoated the blocking-in and over-painted
with Railmatch 2630 SR Light Olive Green Acrylic. It's very close to
the green used on the coaches, perhaps just needing a touch of
lightening for the final coat later. Here they are glued in place.
The clipped-off bogie tie bars are perfect for gluing in behind the
card as strengthening bars:
The next step (which really should have been the
step before the last step) was to file off the door frame and
handles. I soon realised that a file was too generalised and instead
used a sharp craft knife to peel them off:
That's all for that section for now. Painting all
the cracks and filing and gaps, etc, will come at the end. The next
step is to add door handles and grab handles, so it makes sense to
paint them in brass first. Even if some of the paint comes off
during handling, it'll be easier to touch it up when they're in
place than it would be to paint them from scratch:
Next comes drilling the holes in the carriage and
inserting the first handles...
|
|