|
27 August 2014
This article is based on a thread in the N Gauge
Forum, and has been compiled from conversations that helped to repair
the split gears on a Graham Farish Class 20 diesel locomotive from the
Poole-era.
Purchasing a cheapish Class 20 diesel because the chassis
was needed for a new kit body may not have been my brightest idea. Especially
as it had split gears. So before it could be used, the split gears had to be
replaced, and this particular idiot needed an idiot's guide to achieve that.
And a lot of help from other people. Thankfully various members of the N Gauge
Forum were there to provide that, and between us we managed to get the job
done.
This article is a compilation of all the best bits.
Tools you will need at the very least: a flat-bladed screwdriver,
a nail punch or similar, and long-nosed tweezers. Recommended tools: a desktop
magnifying glass, preferably with a light.
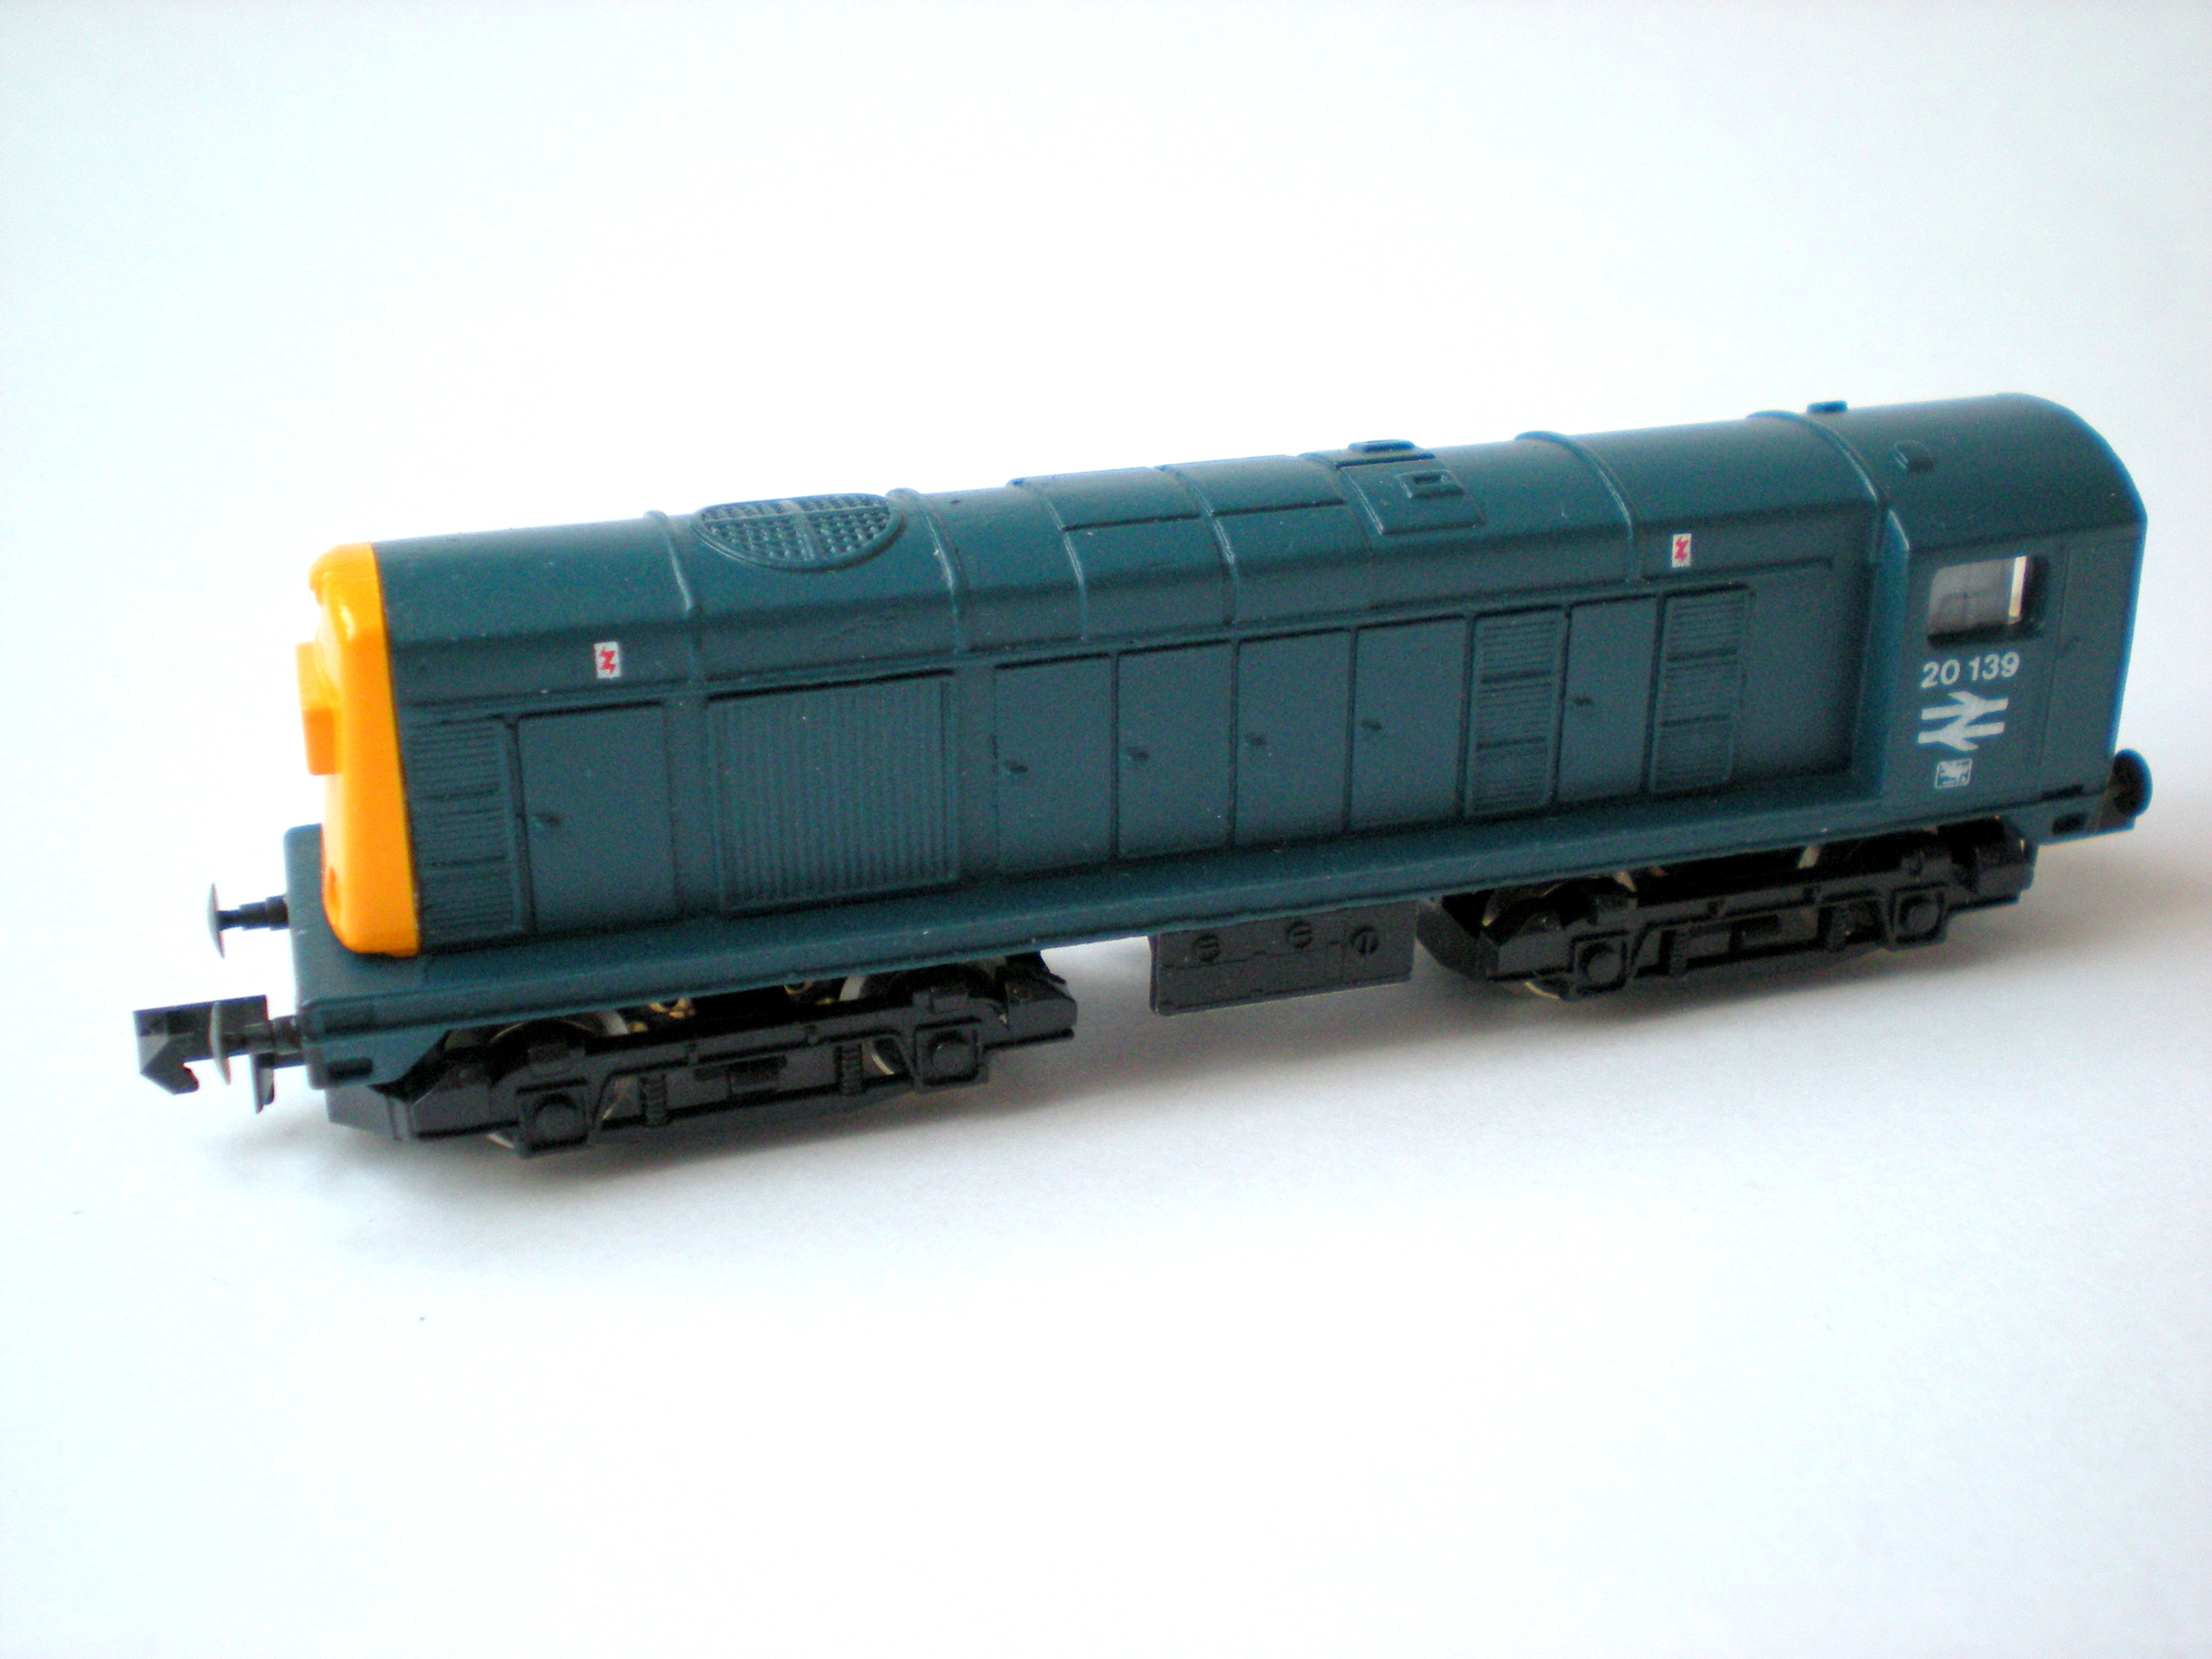
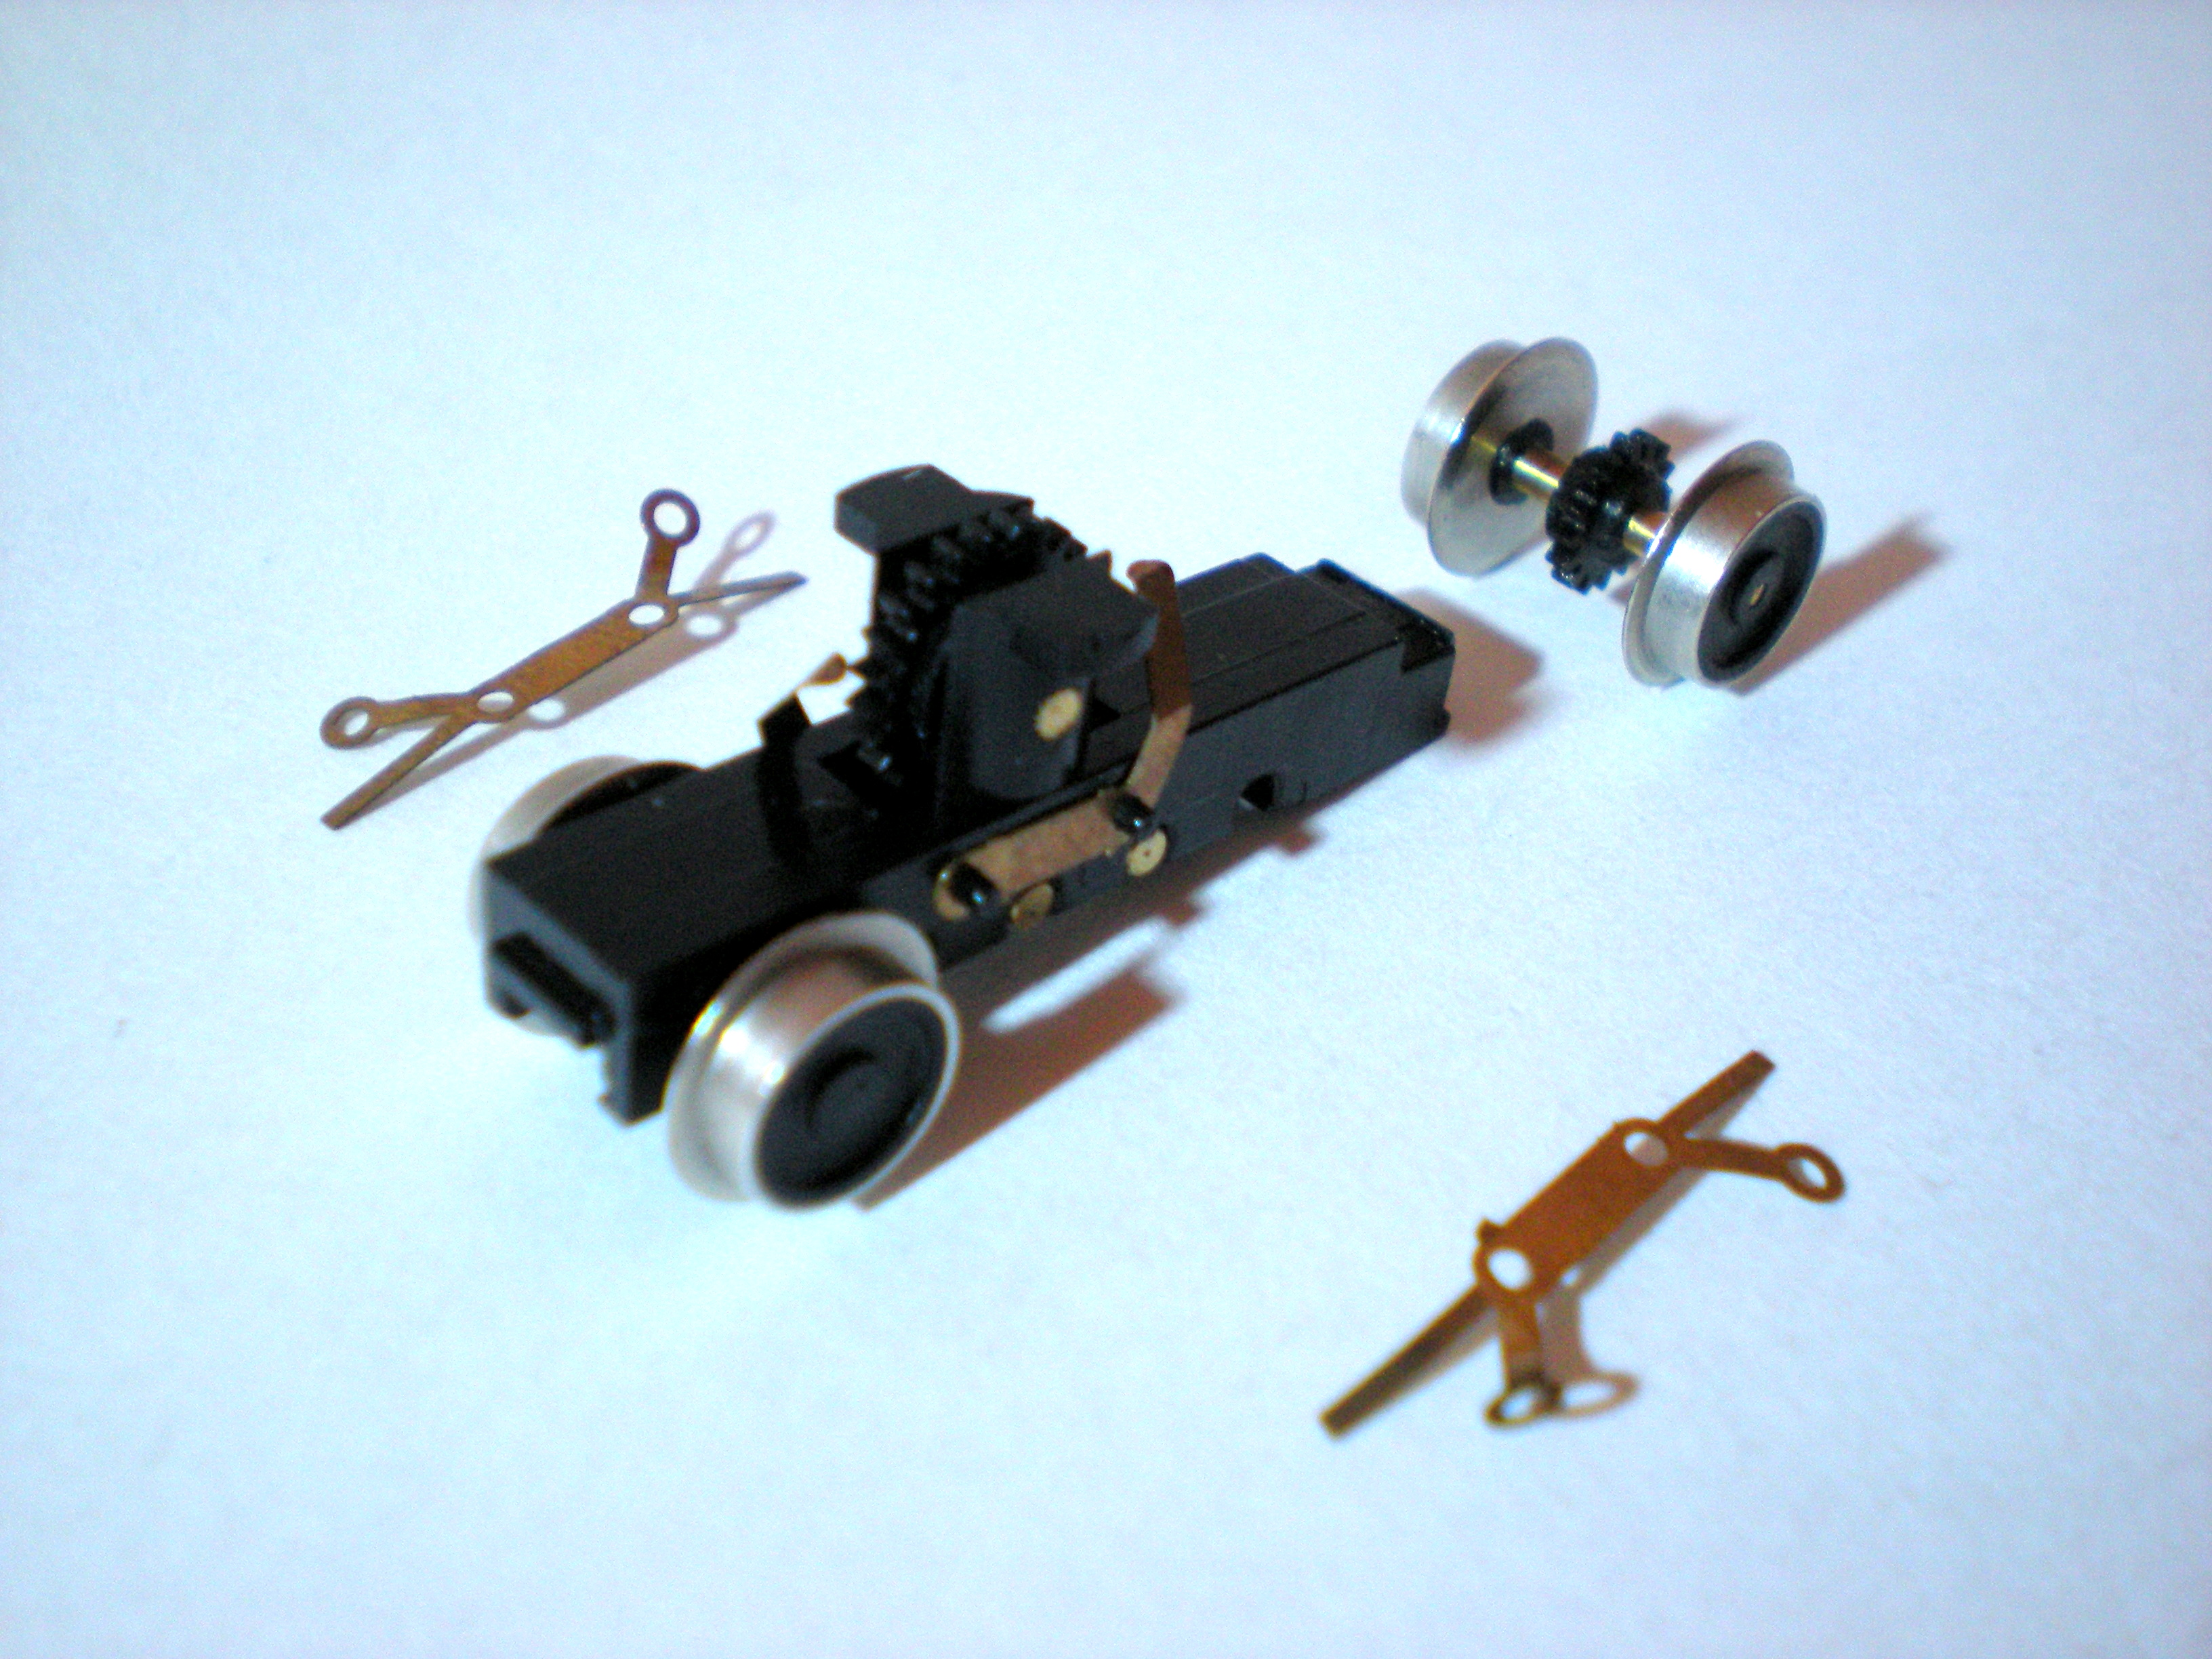
Here's the Class 20, which was relatively cheap because
of those split gears:
I understood from various sources that if one gear is
split then all of them should be replaced, but other than that, this
was all new to me. I didn't even know how to take apart the loco
safely, so here's my learning curve.
To begin with, the loco's yellow front panel was loose,
so a fingernail could be used to prise it off, leaving one visible screw
(see next picture). If the panel isn't loose you need to take some care
in prising it off, as I've heard that the plastic prong that holds it in
place can be snapped off if you're not careful.
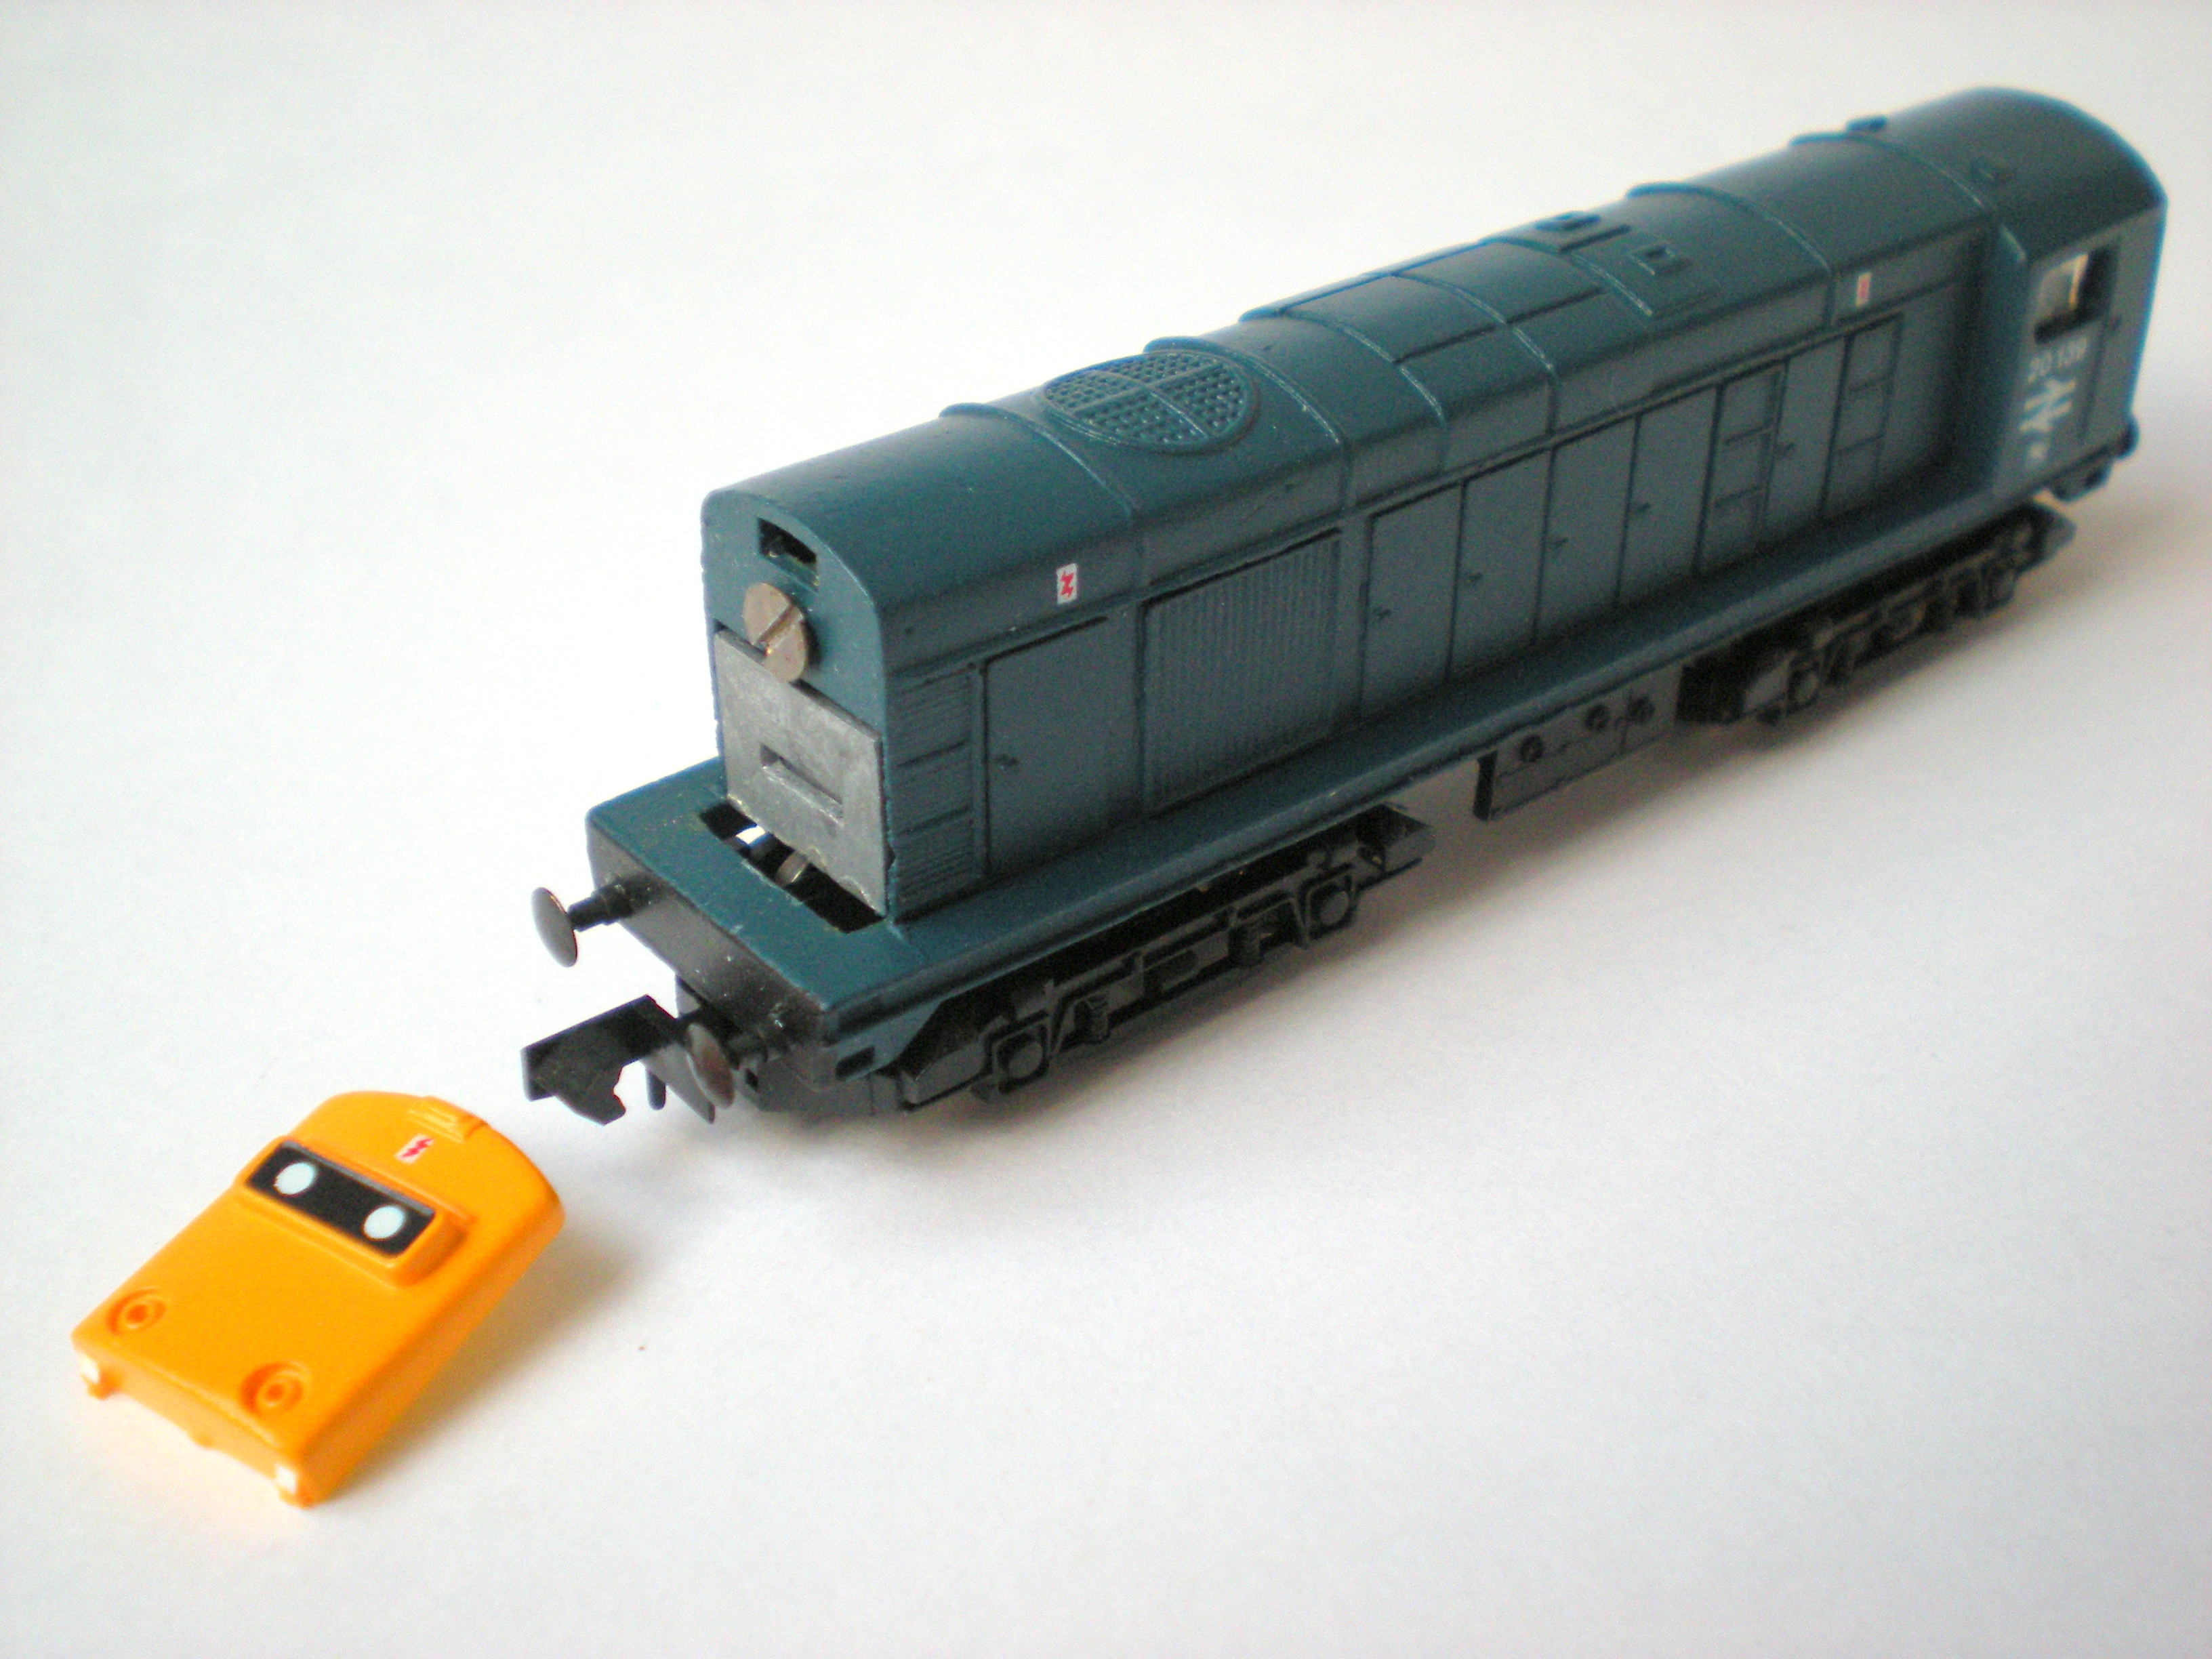
With a small, flat-bladed screwdriver, loosen and
remove the front screw.
Then use the screwdriver or a fingernail, placing
either between the blue bodywork and the top of the metalwork at the
front (immediately underneath the front screw in the photo above).
Twist the screwdriver or push downwards with the
fingernail while pulling the blue bodywork in the opposite
direction. The two should slide apart (shown in the next photo).
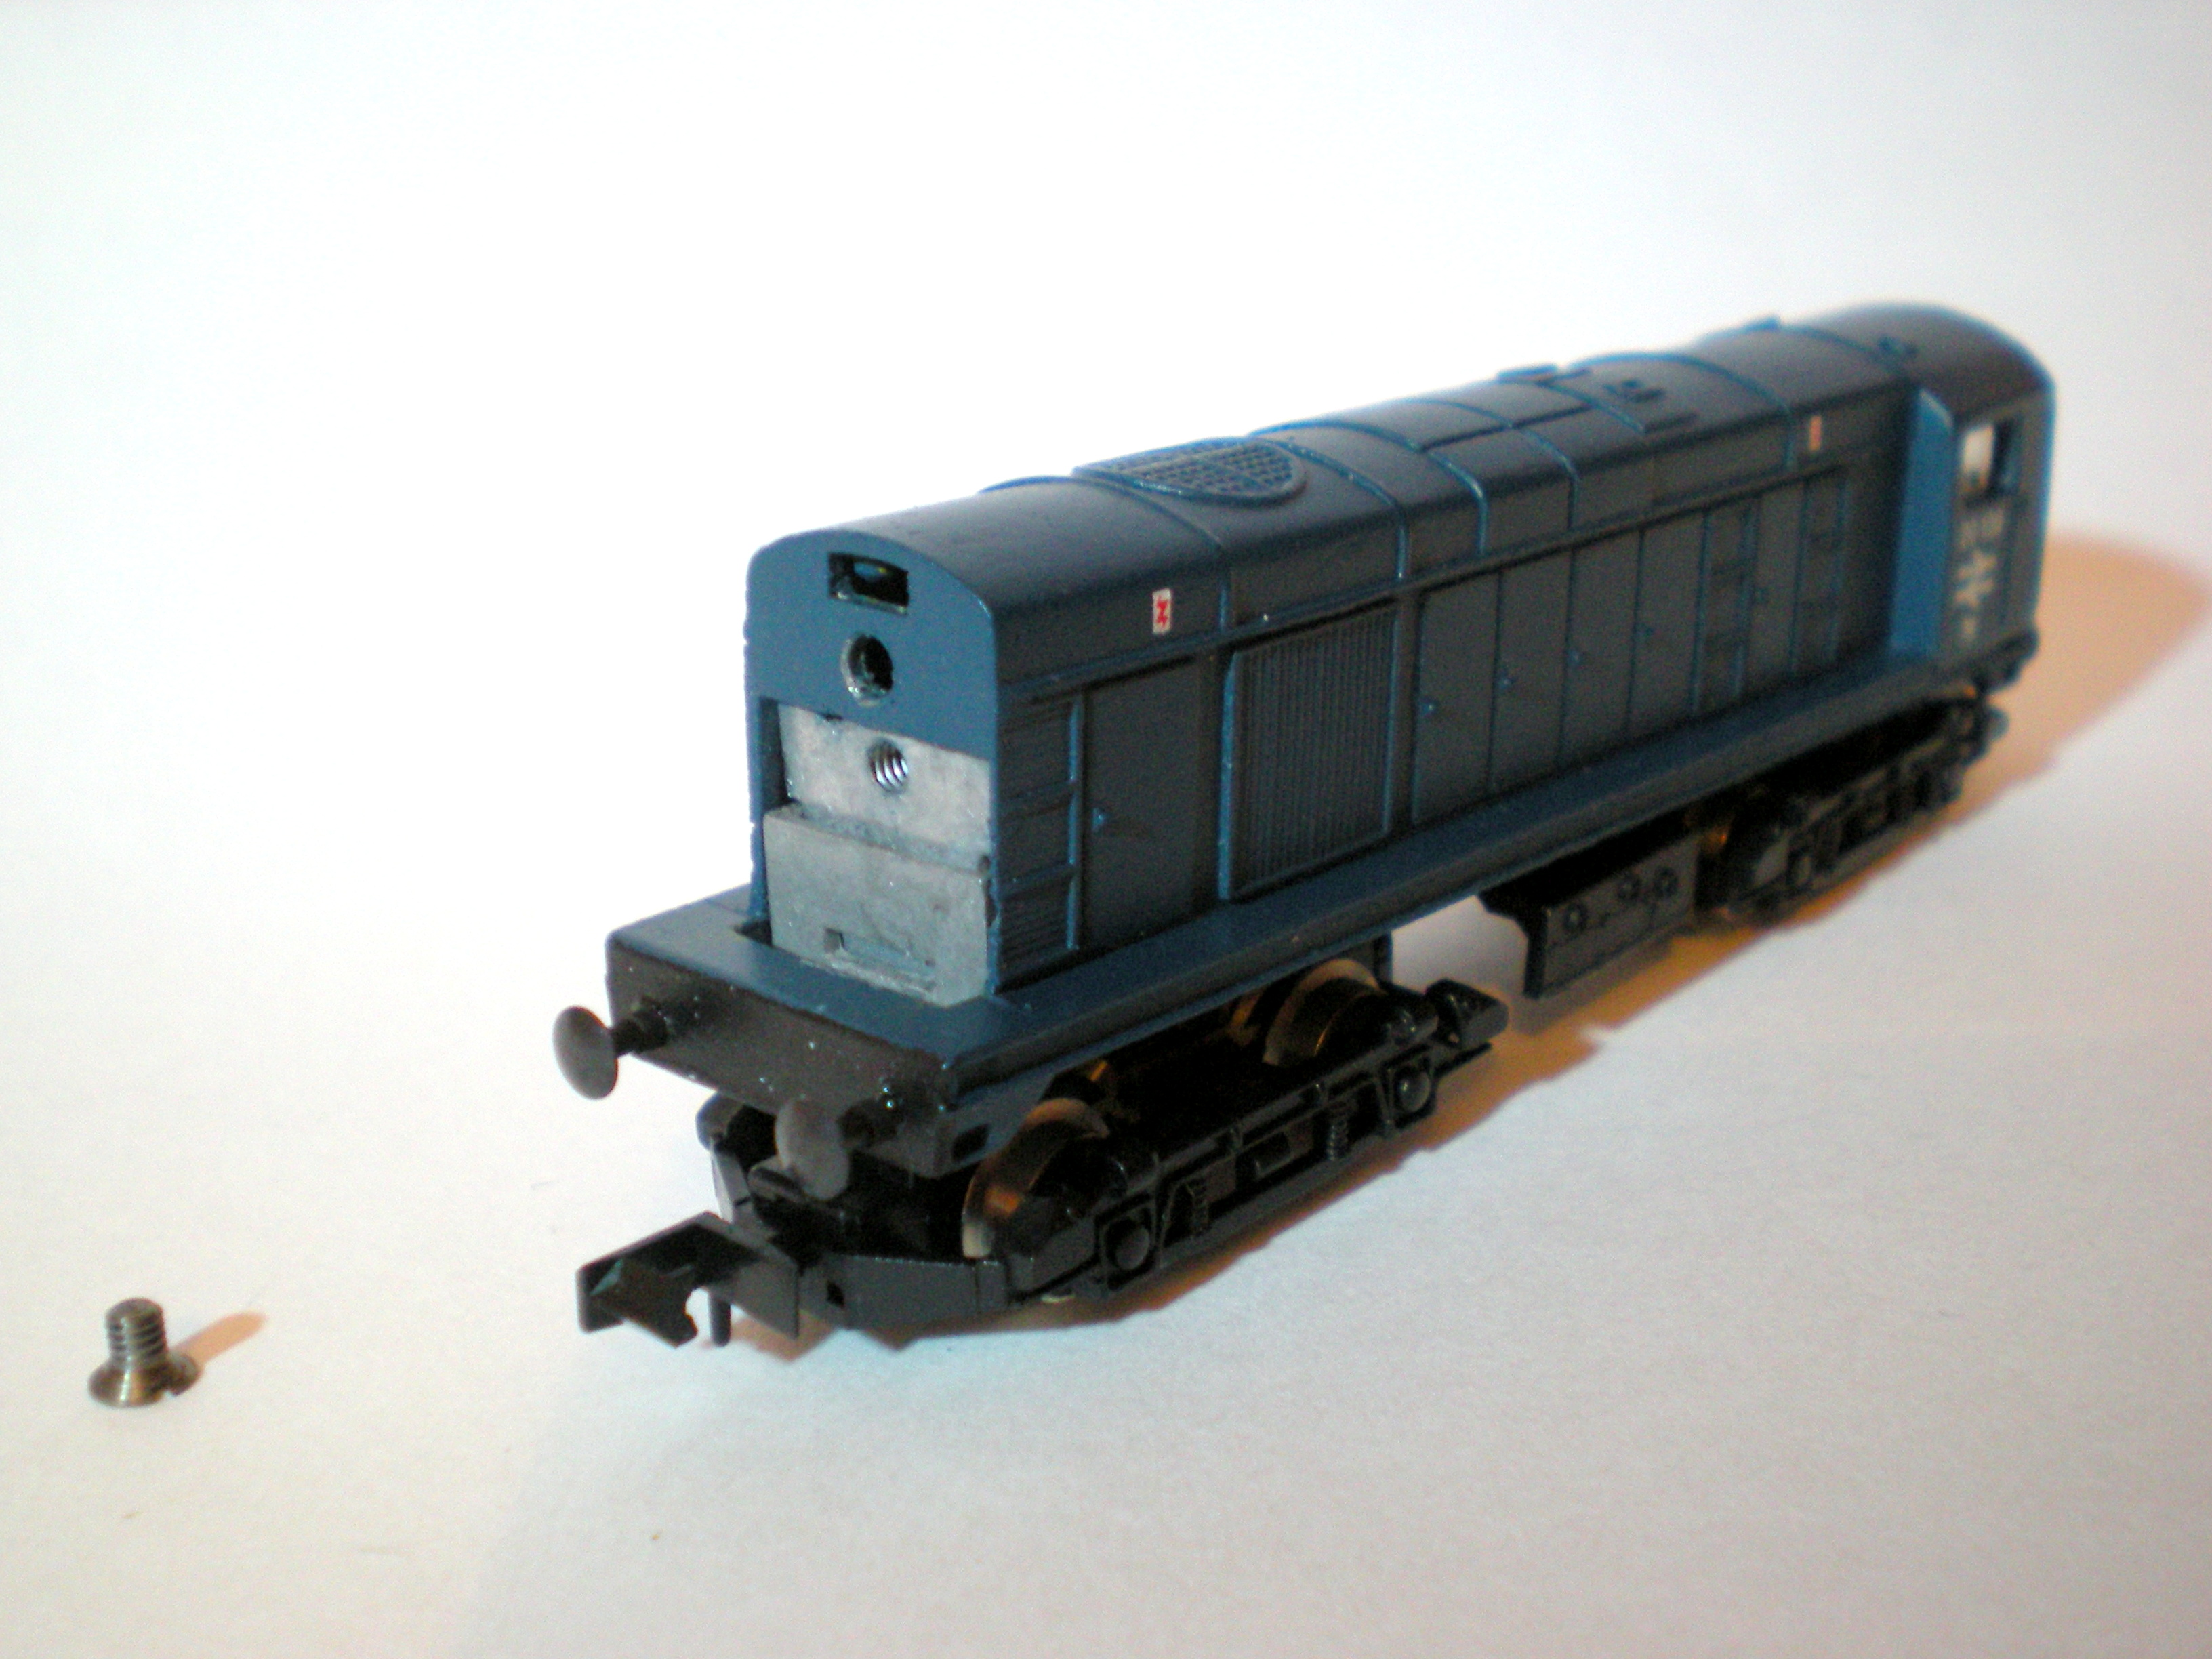
The bodywork and chassis are now separated. It would
be a good idea to photograph each stage of the work so that you can be
entirely sure how to reassemble the loco, especially when it comes to
the chassis frames and bogies.
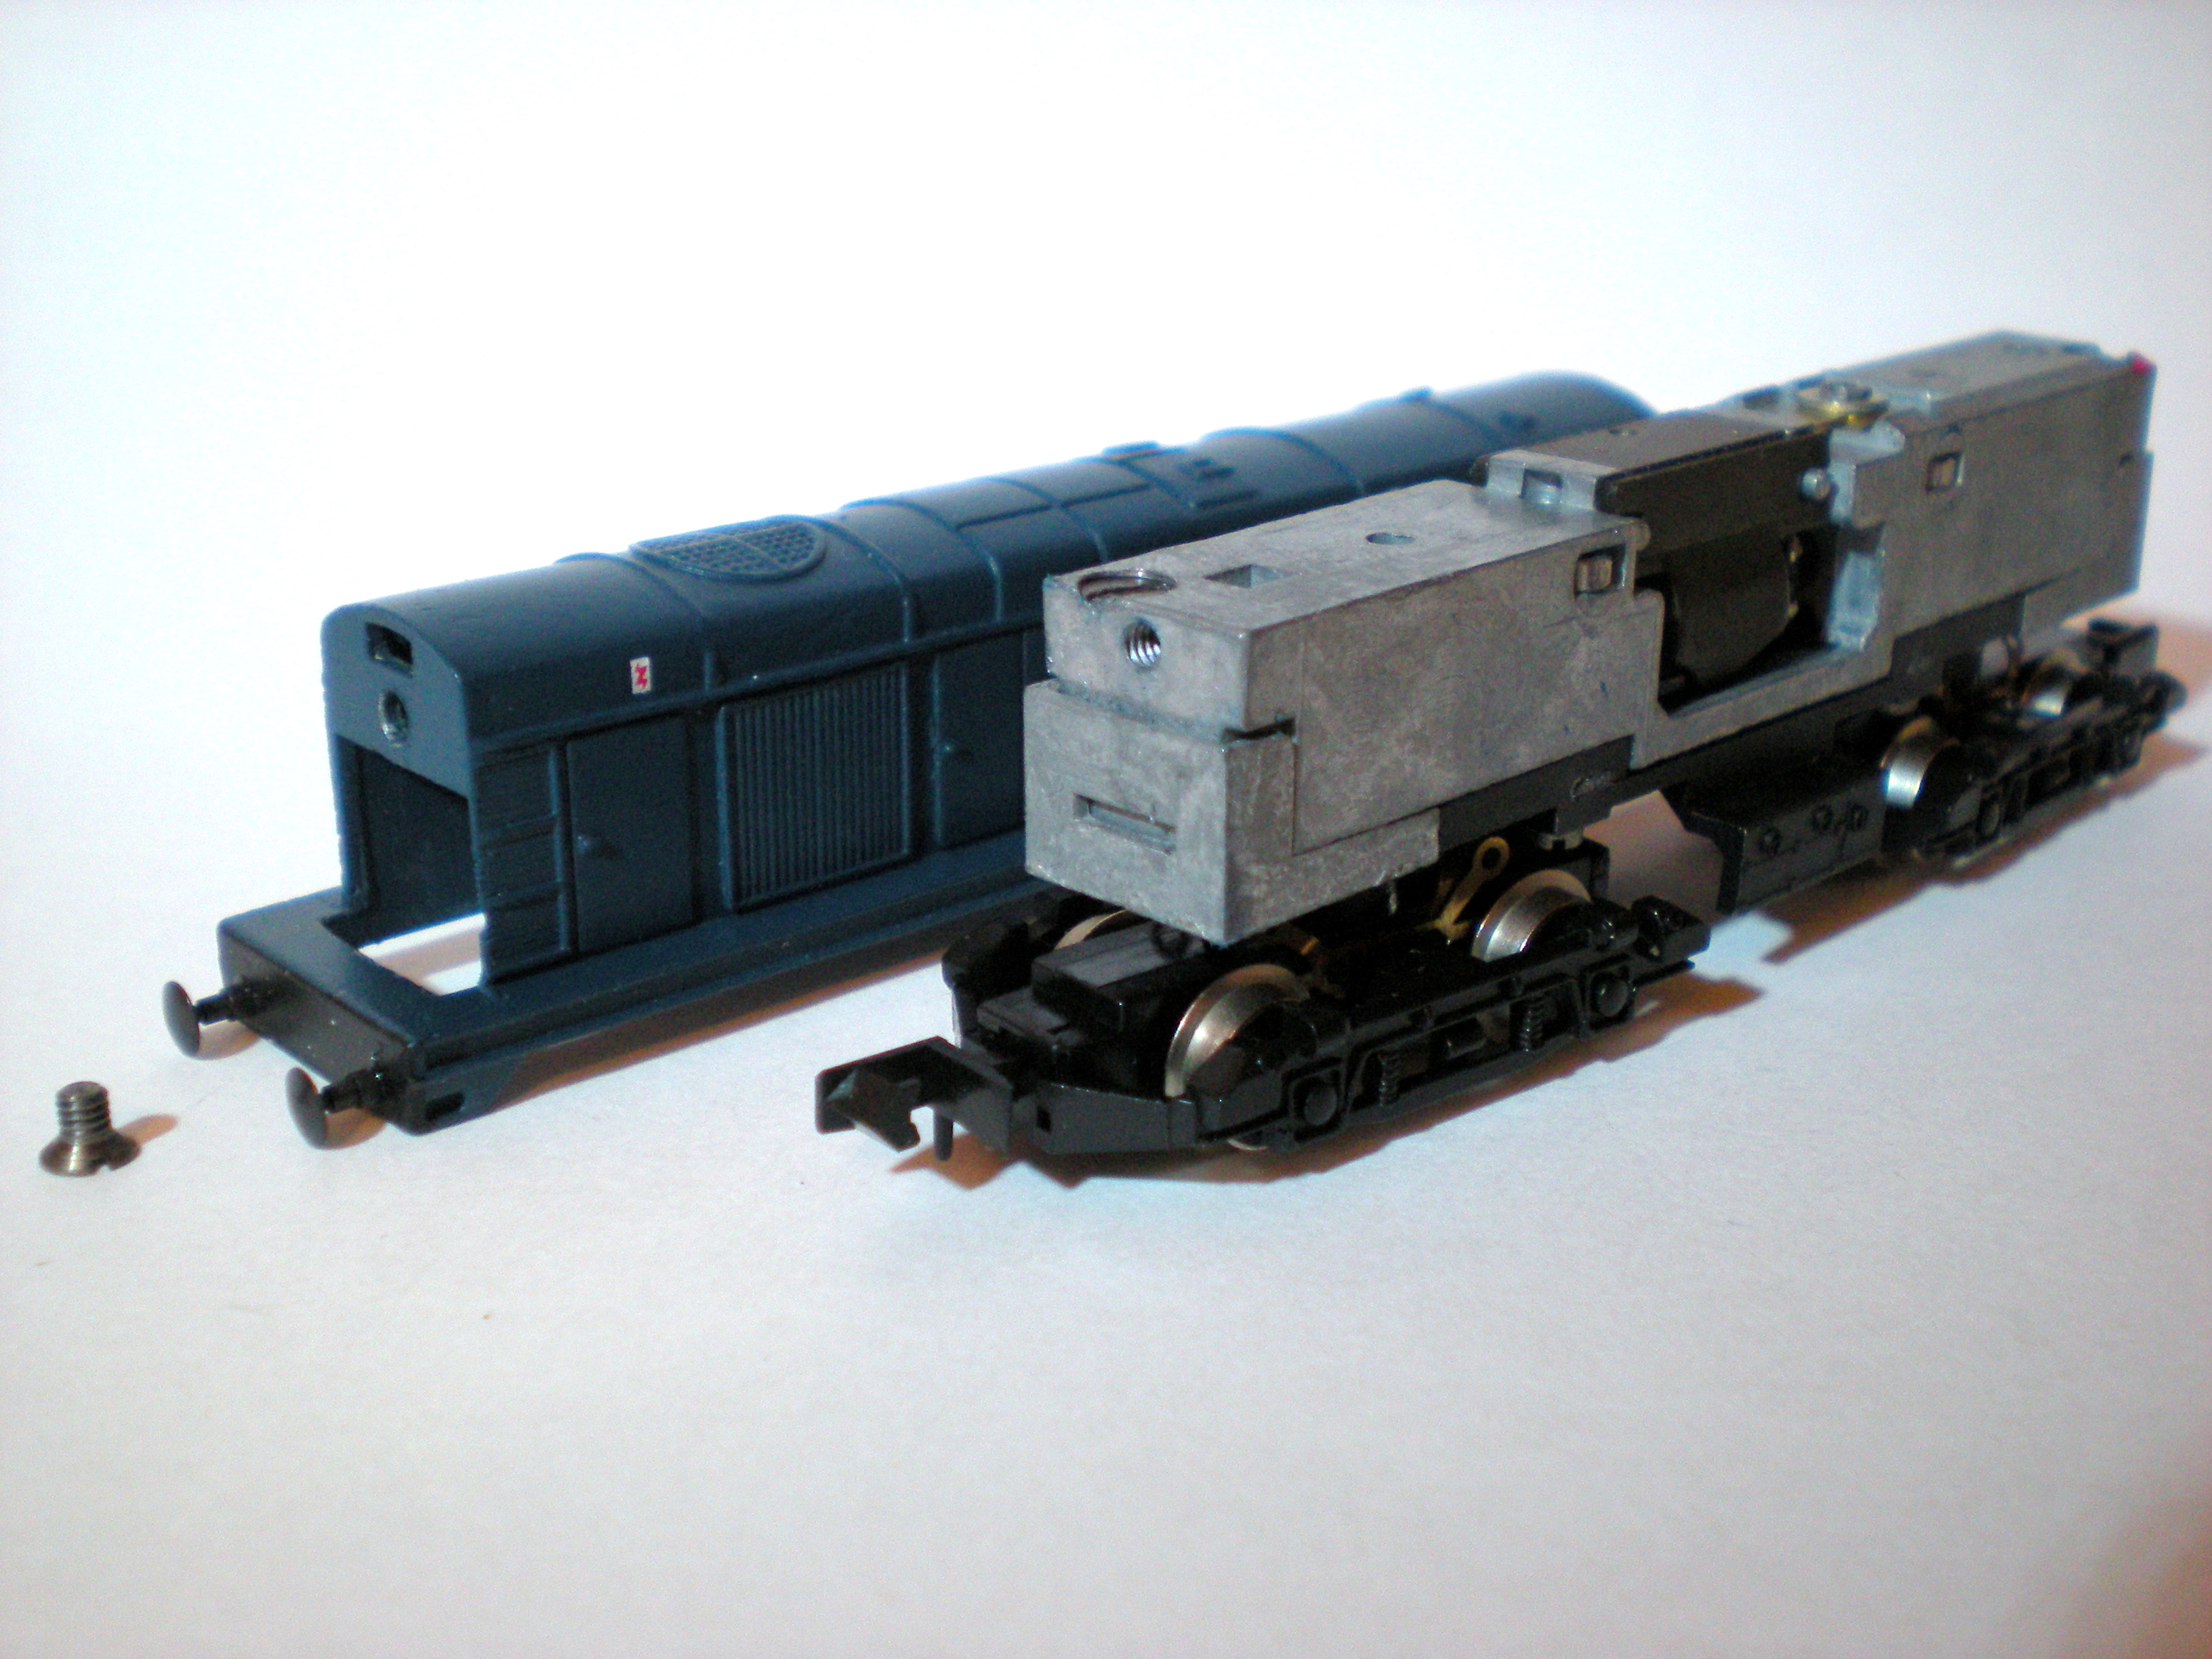
On top of the chassis block (the grey metal section
that houses the motor) are two long screws, located in diagonally
opposite corners of the chassis. Unscrew these and draw them out.
Once you have done that, the metal blocks at the front
and back, which hold the bogies in place, will come loose, and perhaps
even fall out of their own accord.
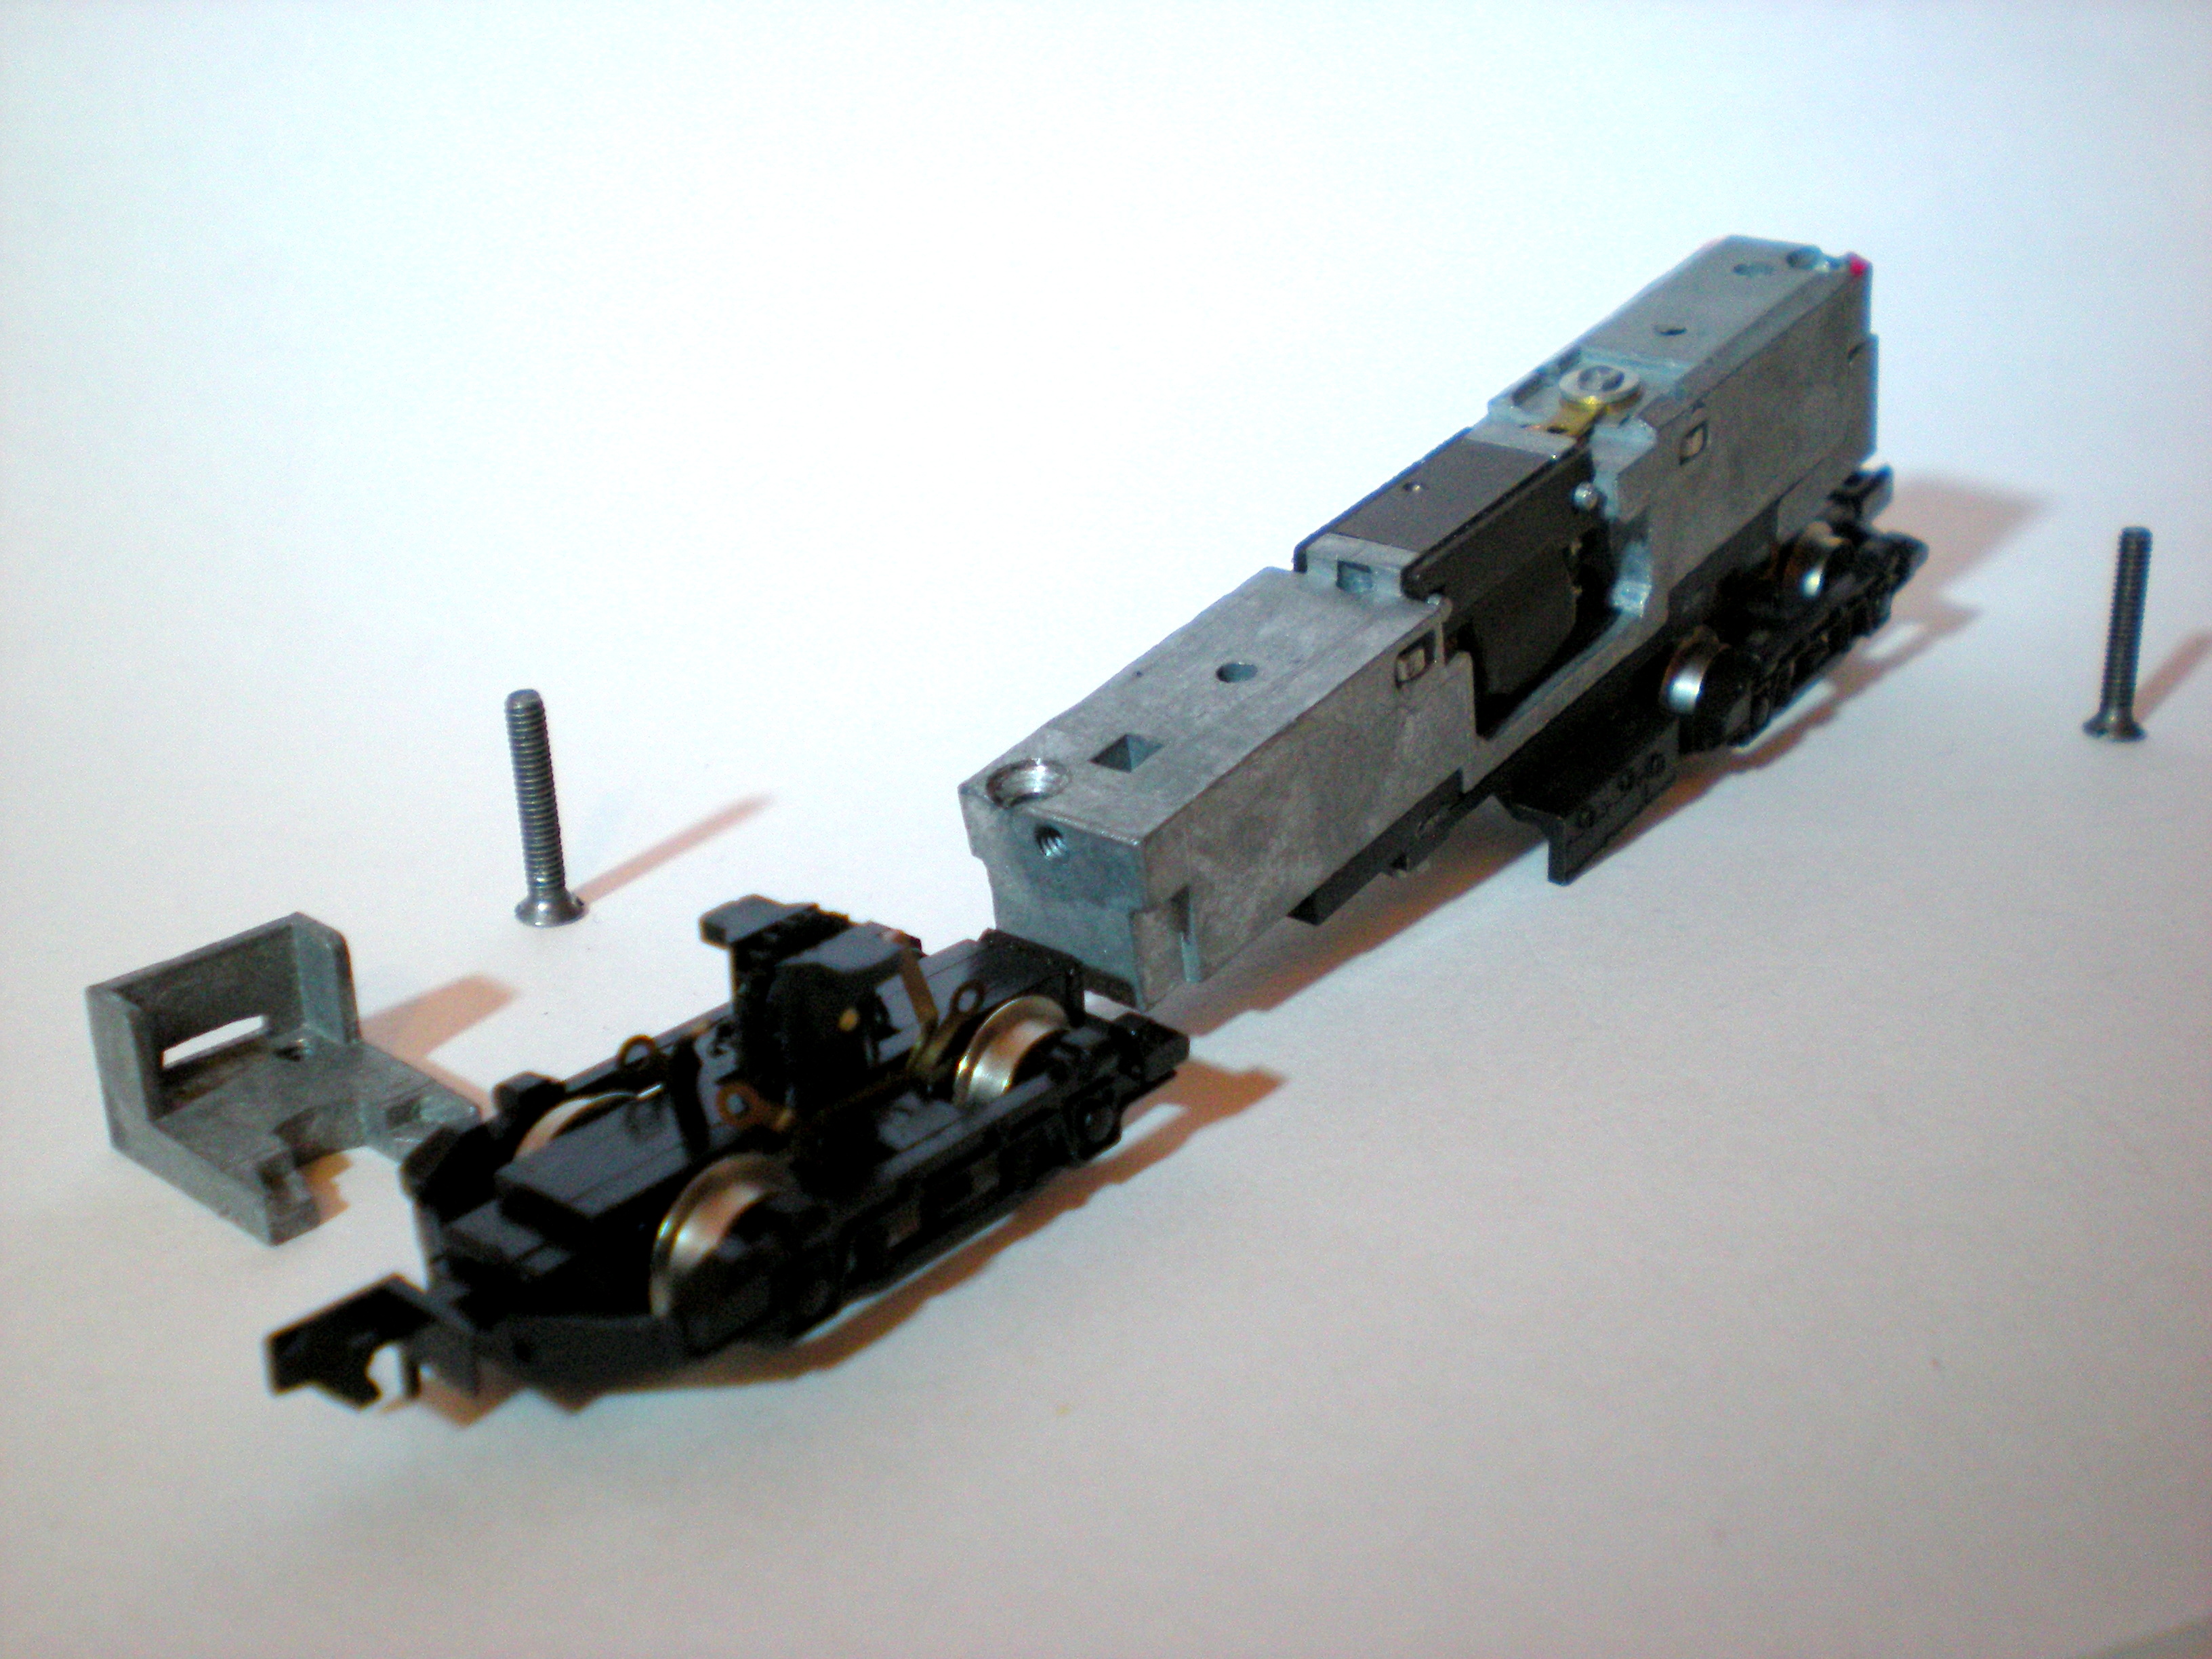
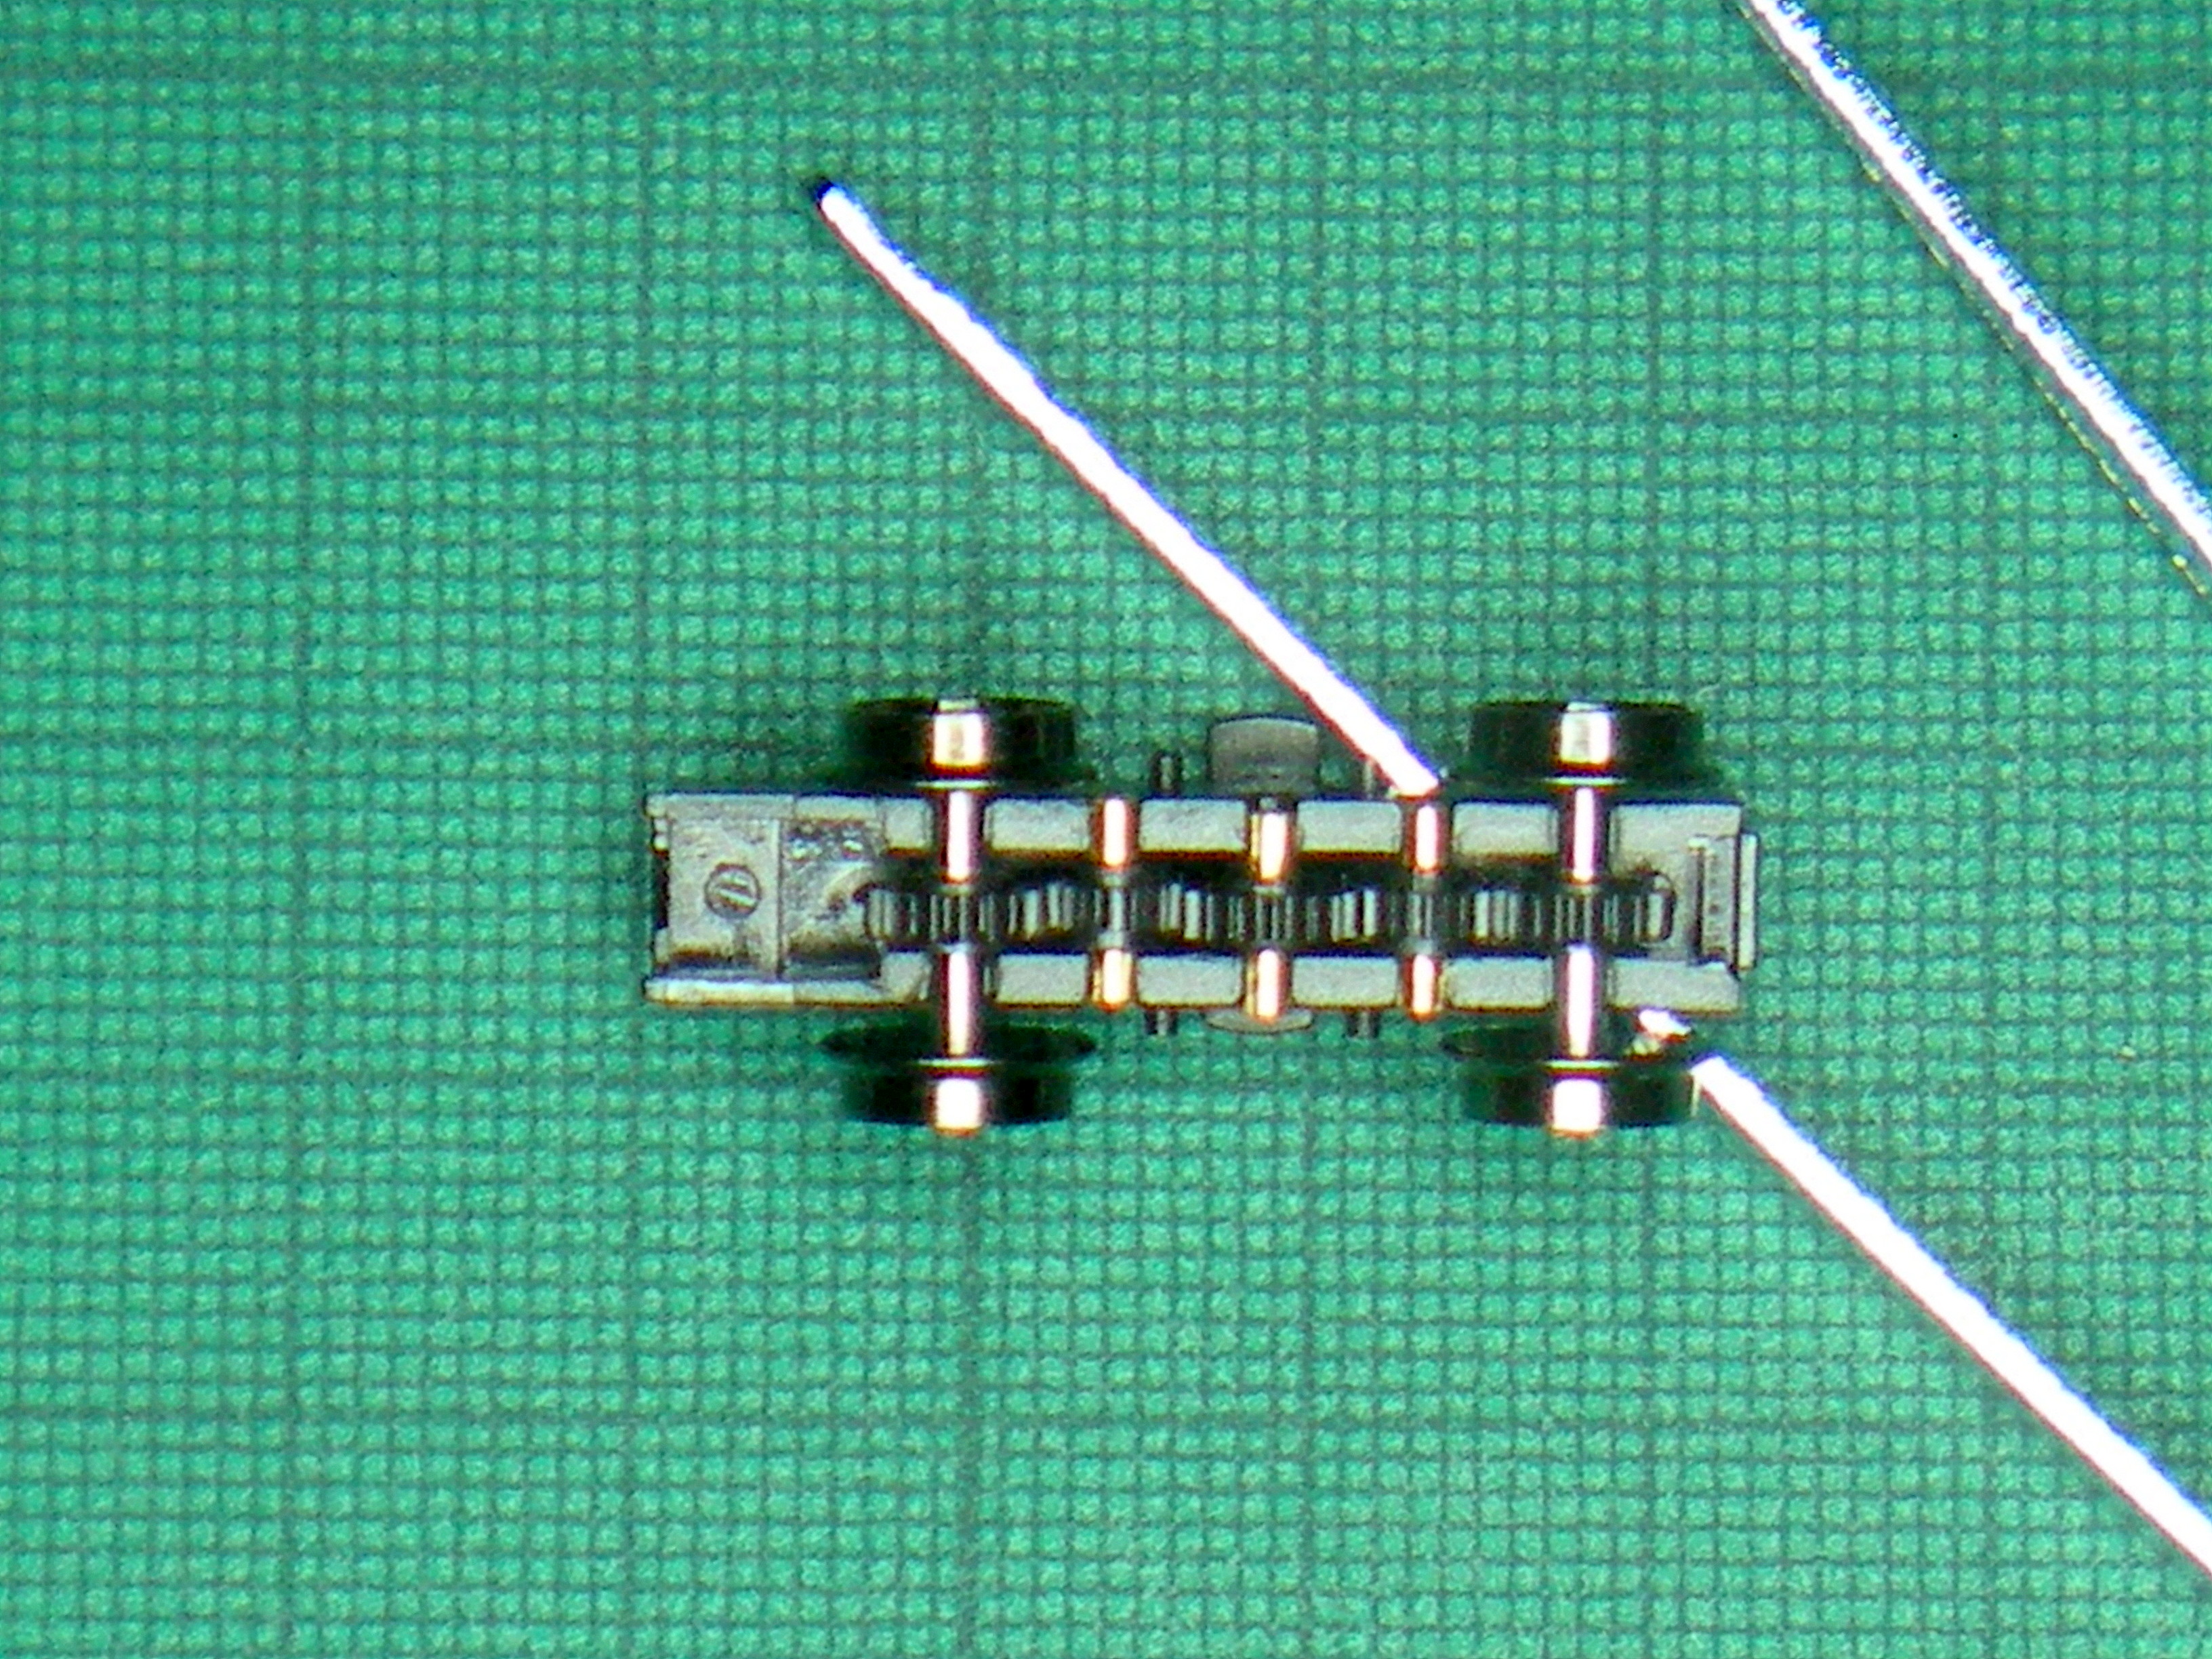
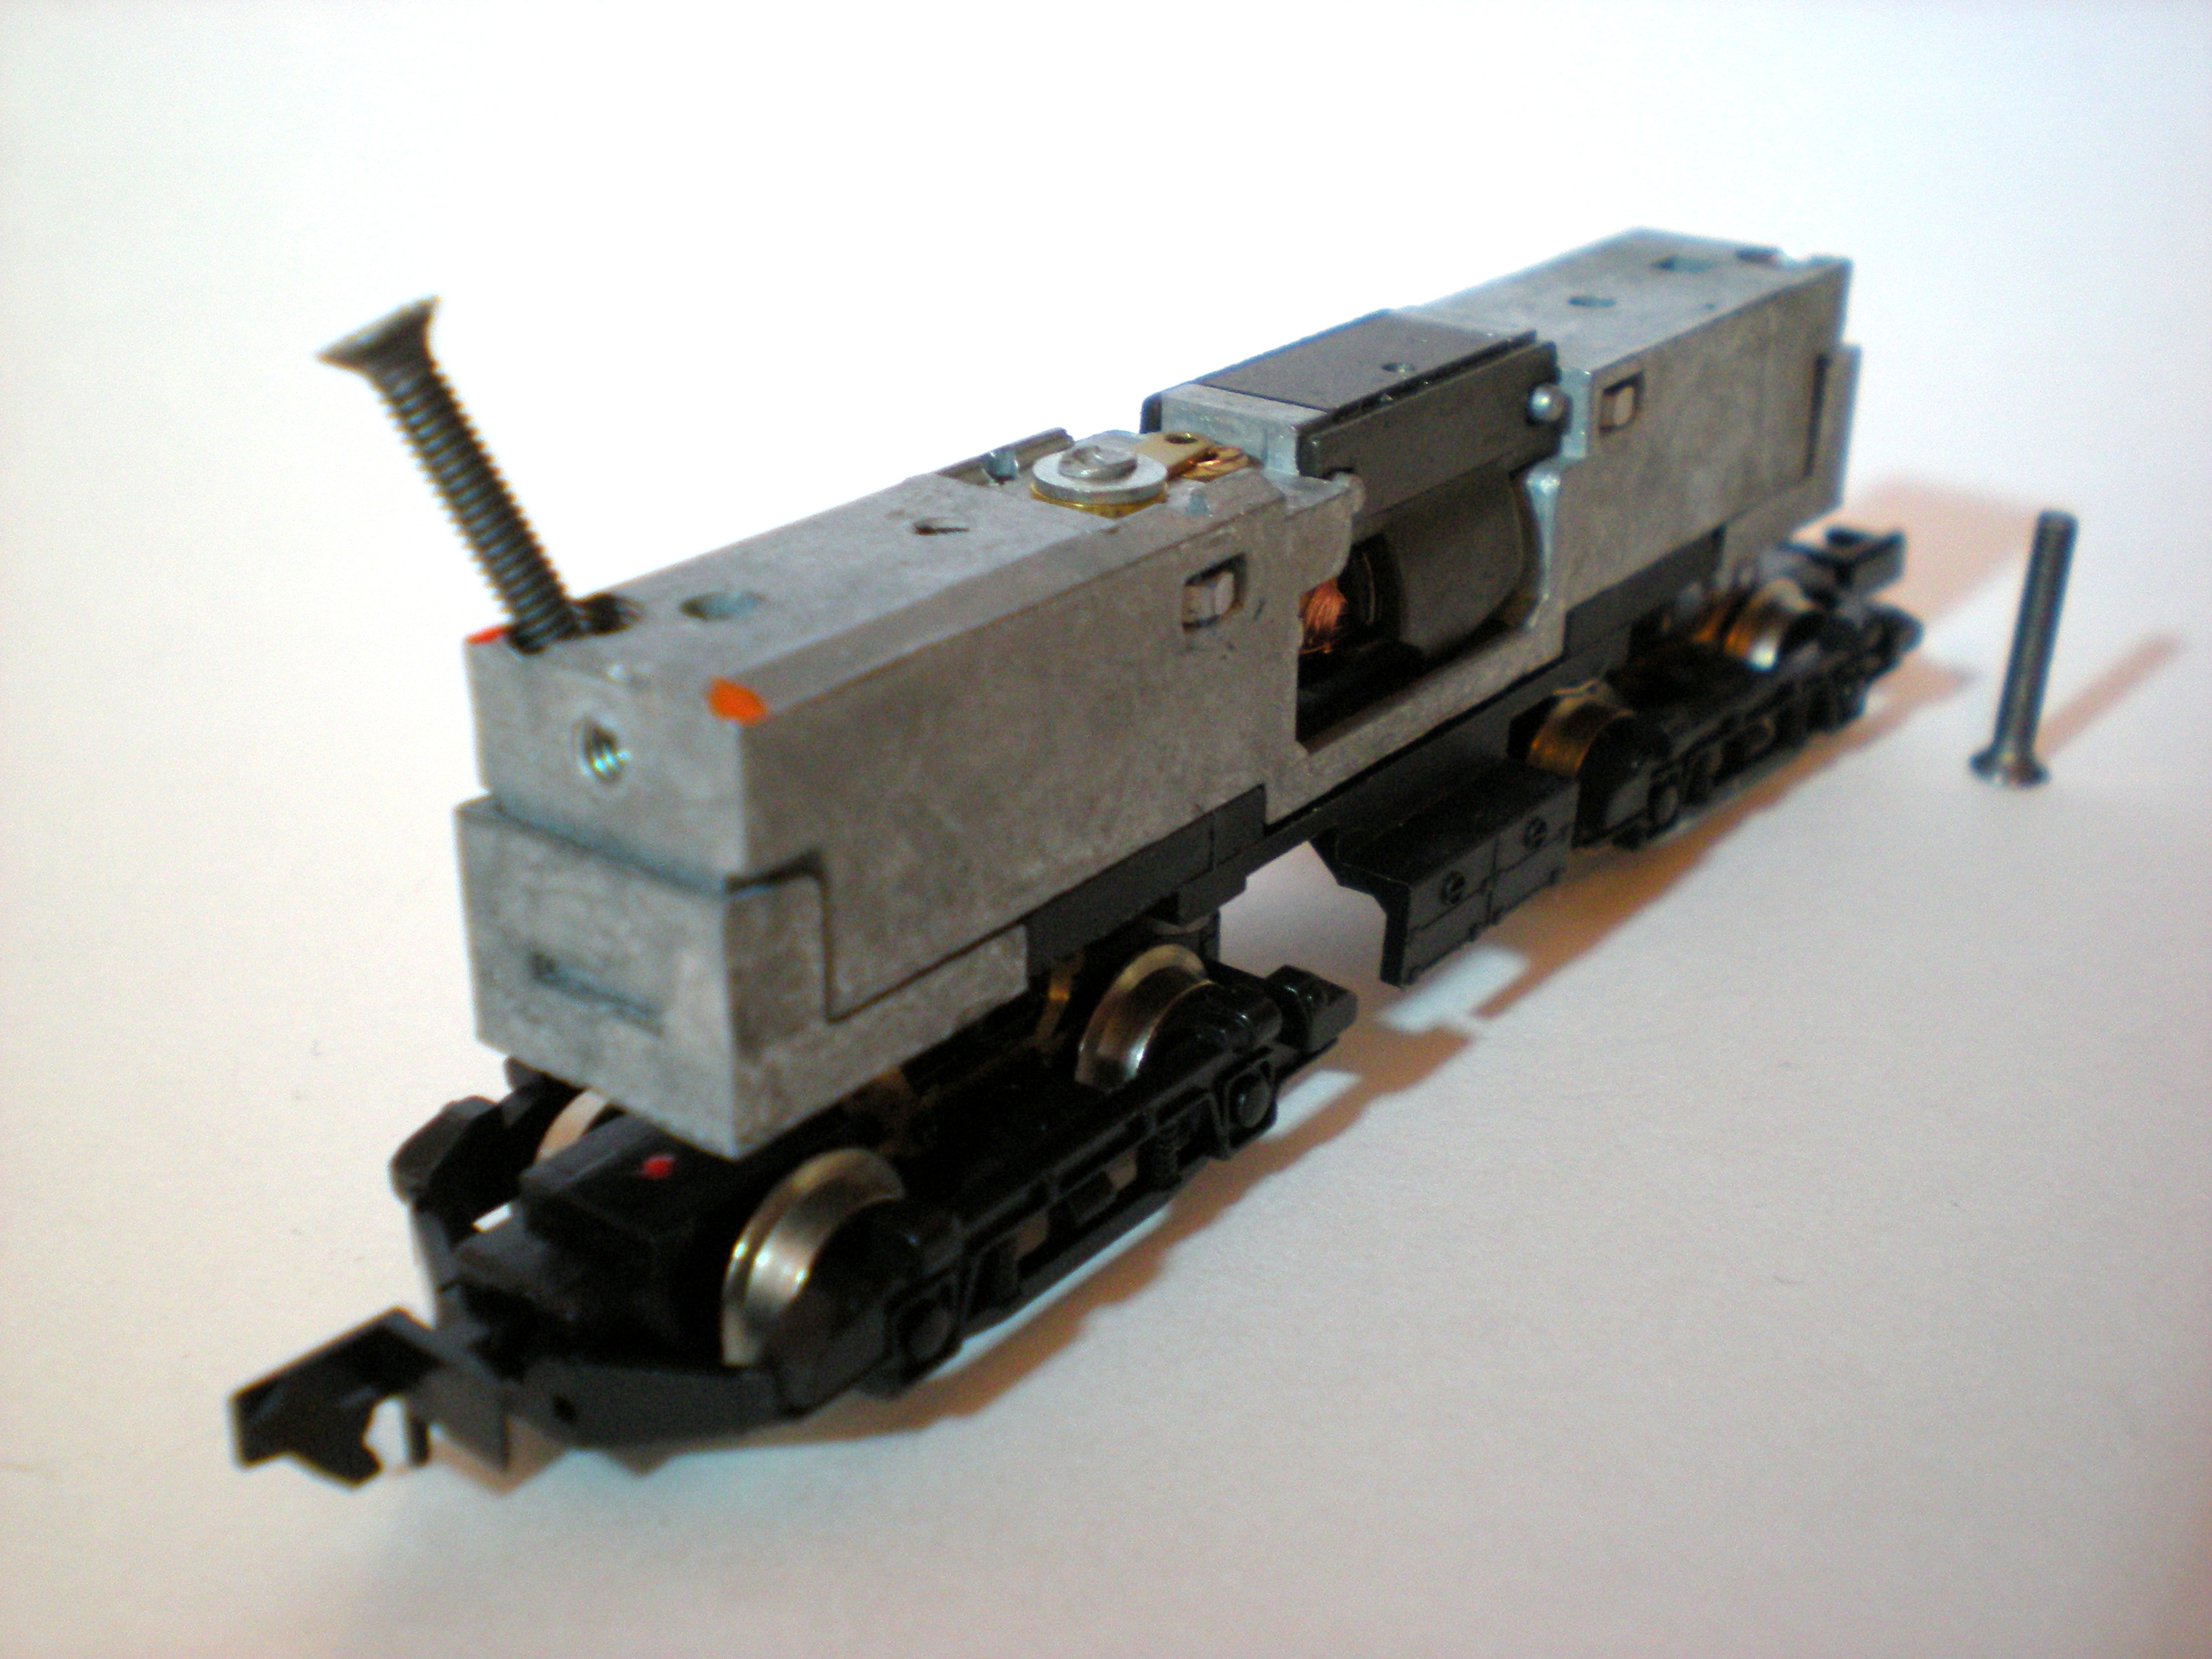
Now you can access the bogie frames and bogies which
hold the wheels and gears.
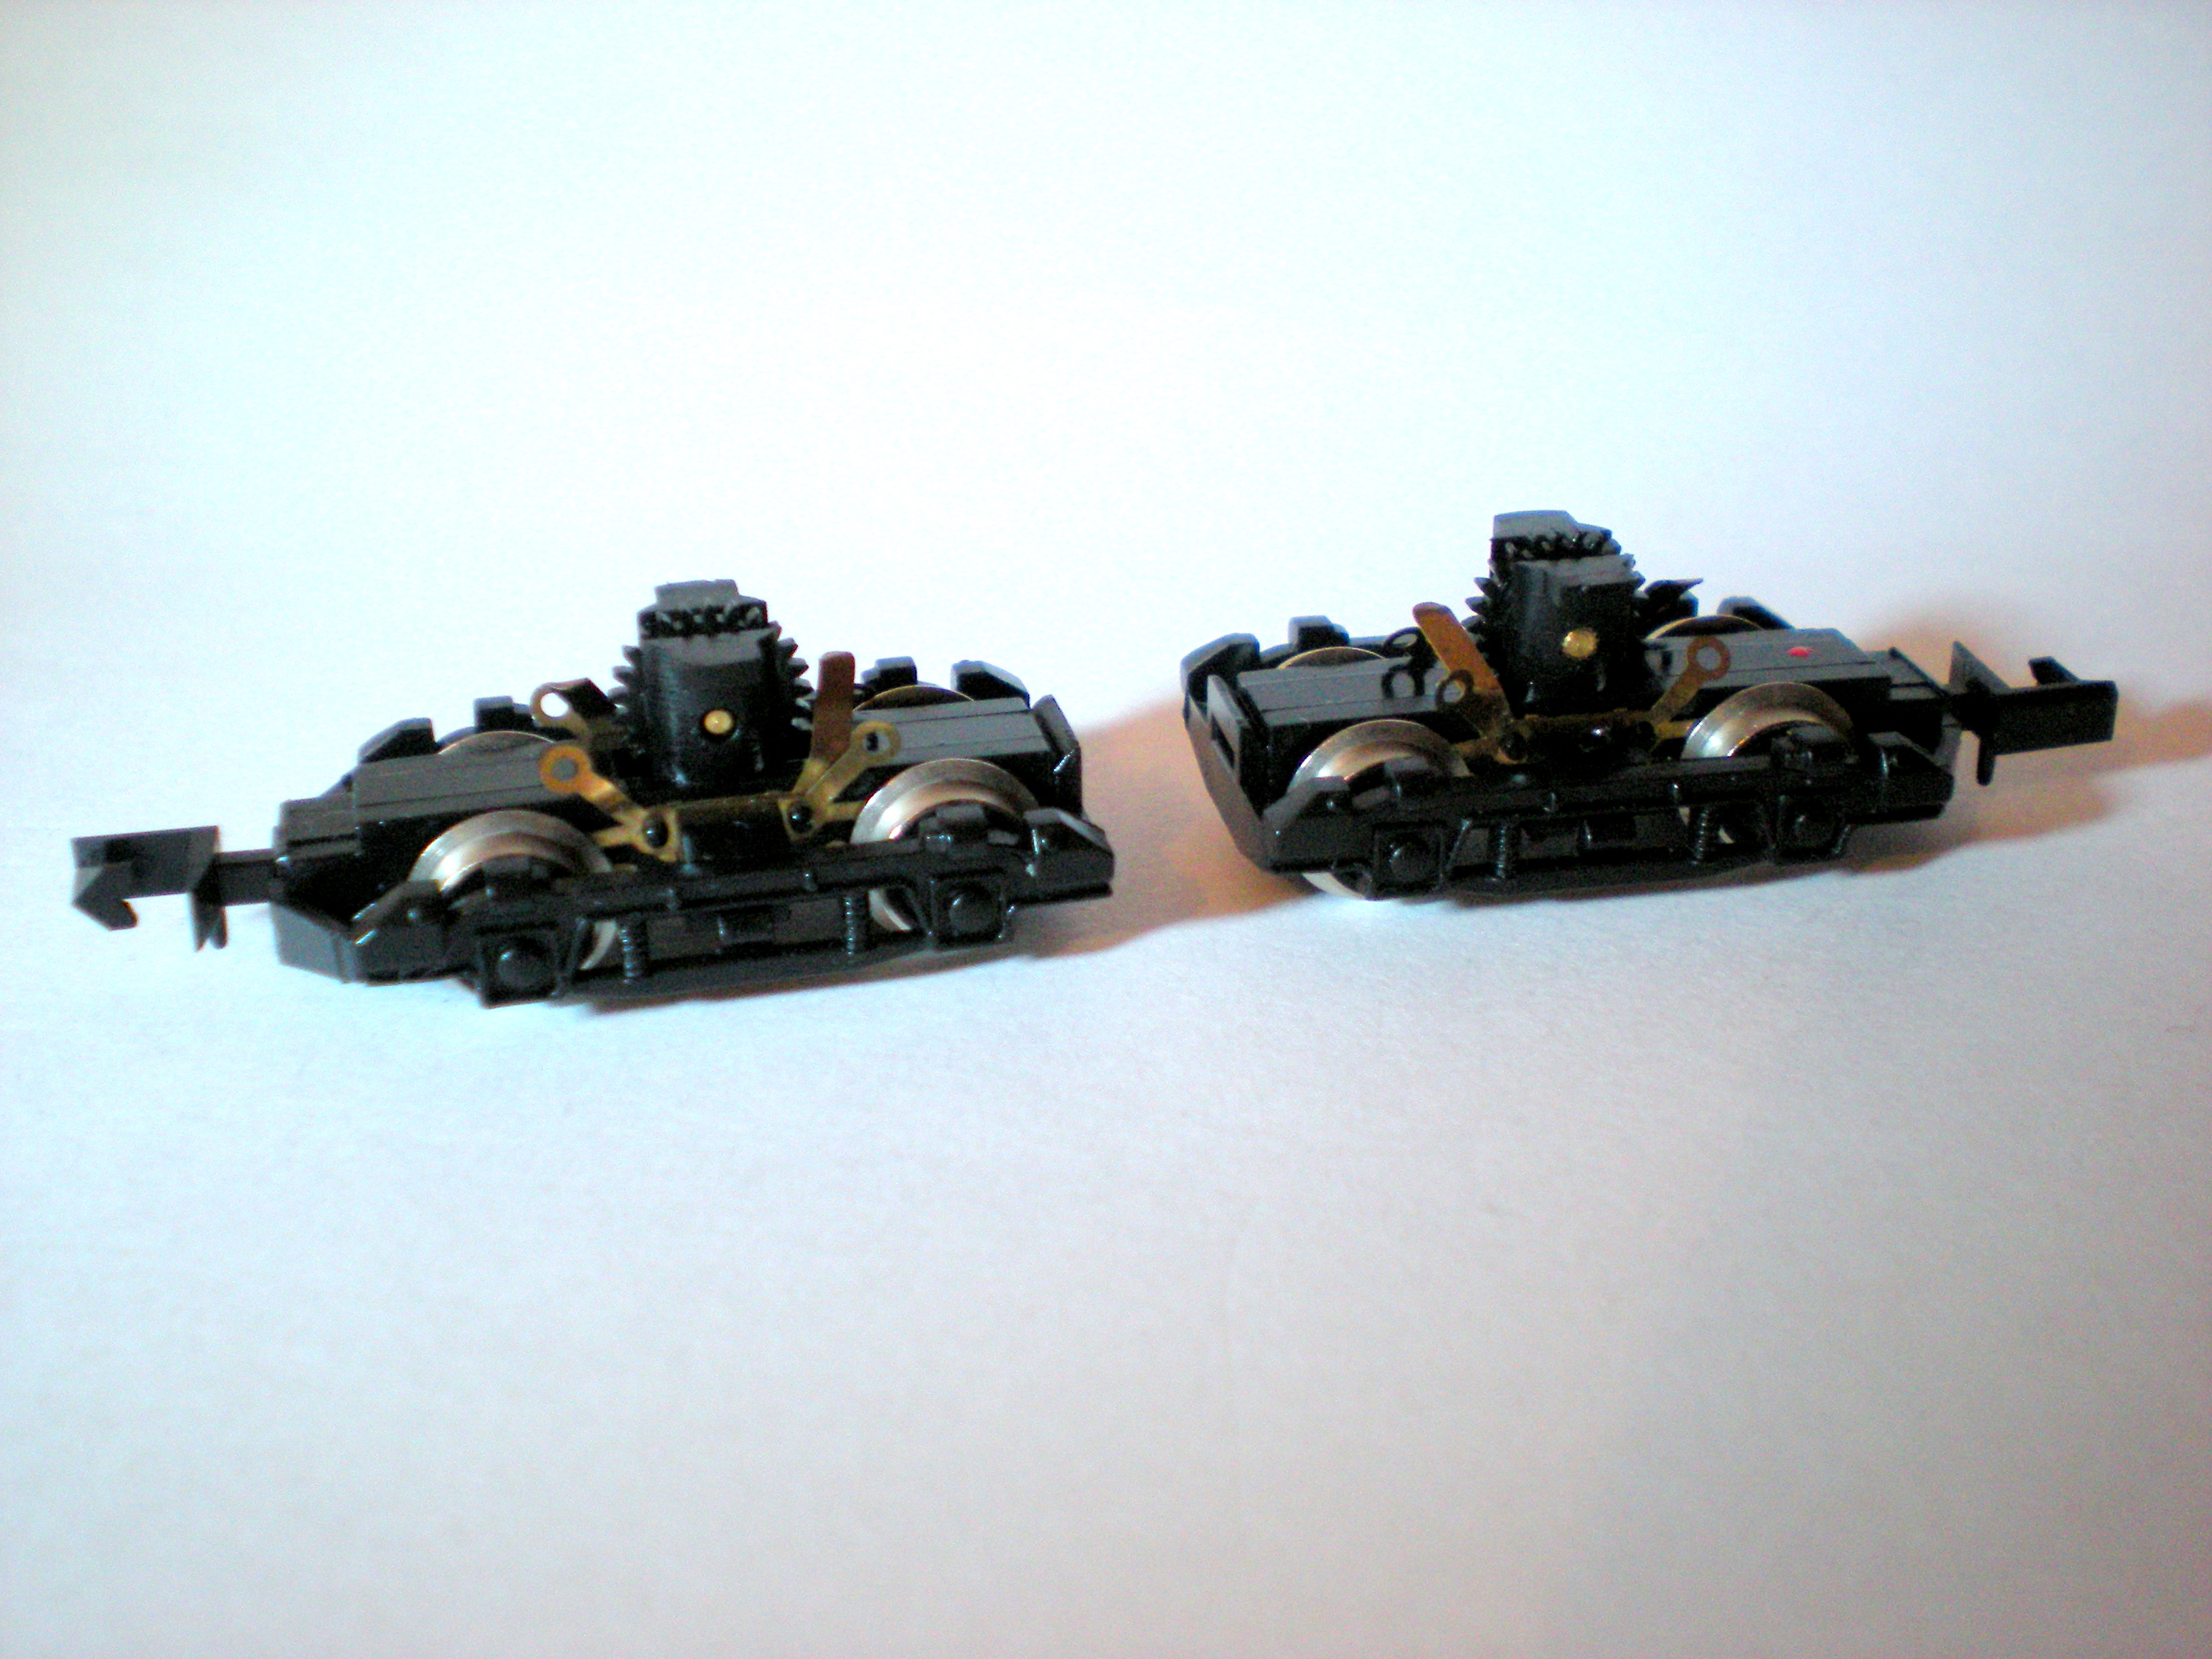
Now you can test each bogie to see which one has the
split gear(s).
Gently push each bogie along a short piece of track.
If there is a tiny bit of give in the gears so that each bogie moves a
fraction before the gears lock then you have a diagnosis.
You can also try manually turning the large gear at the
top of each bogie (shown above) to see if they will rotate all the gears.
In this case, one did so for a few turns (about three), while the other
(the bogie with the red spot, on the right of the photo) wouldn't move at
all. This meant that both bogies had at least one split gear. If one of the
bogies had moved freely without any sticking then the gears would
have been okay.
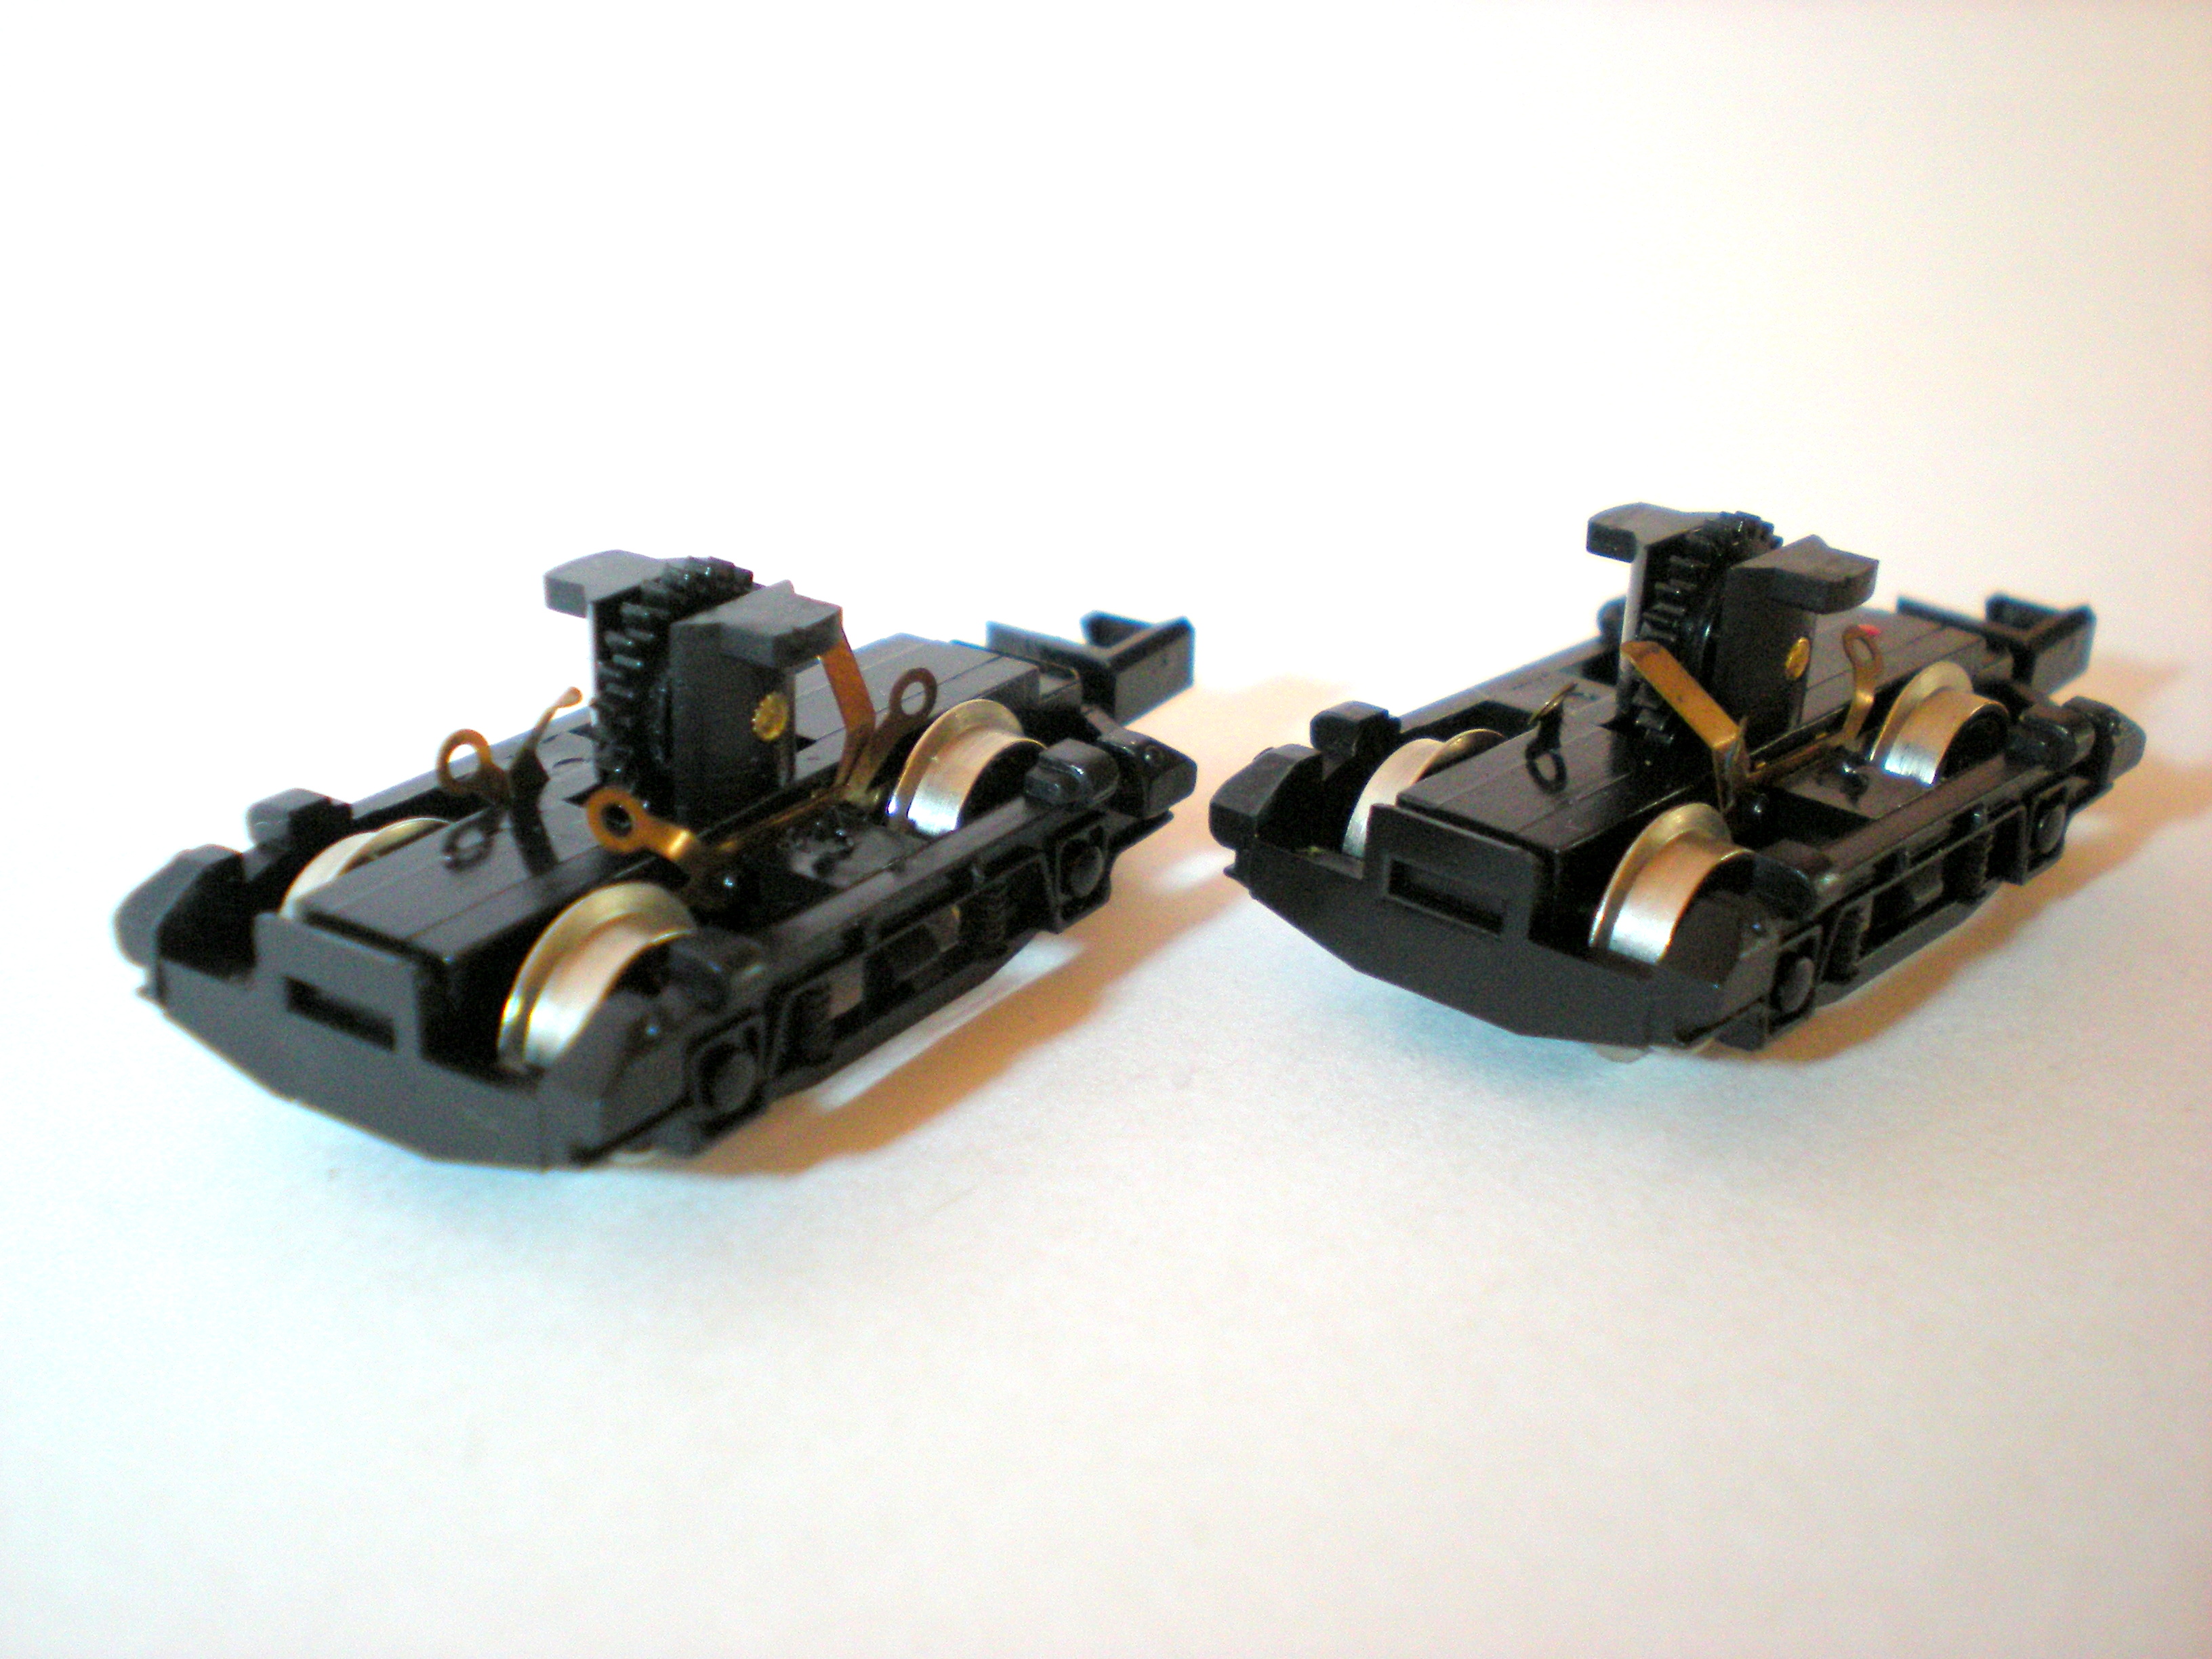
So you've diagnosed at least one split gear per bogie.
Now take out the drive axles of one bogie (don't touch the other as you
can use this as a guide to reassembling the first one).
This stage is best done with everything inside a
large, clear plastic bag - the type that comes with mail order
clothing or well-packaged kitchen equipment. Or, if you work in a
maternity unit, a spare incubator would do the trick. This cannot
be made clear enough. A plastic bag (or maternity unit) is your only
hope of surviving this stage with your sanity intact.
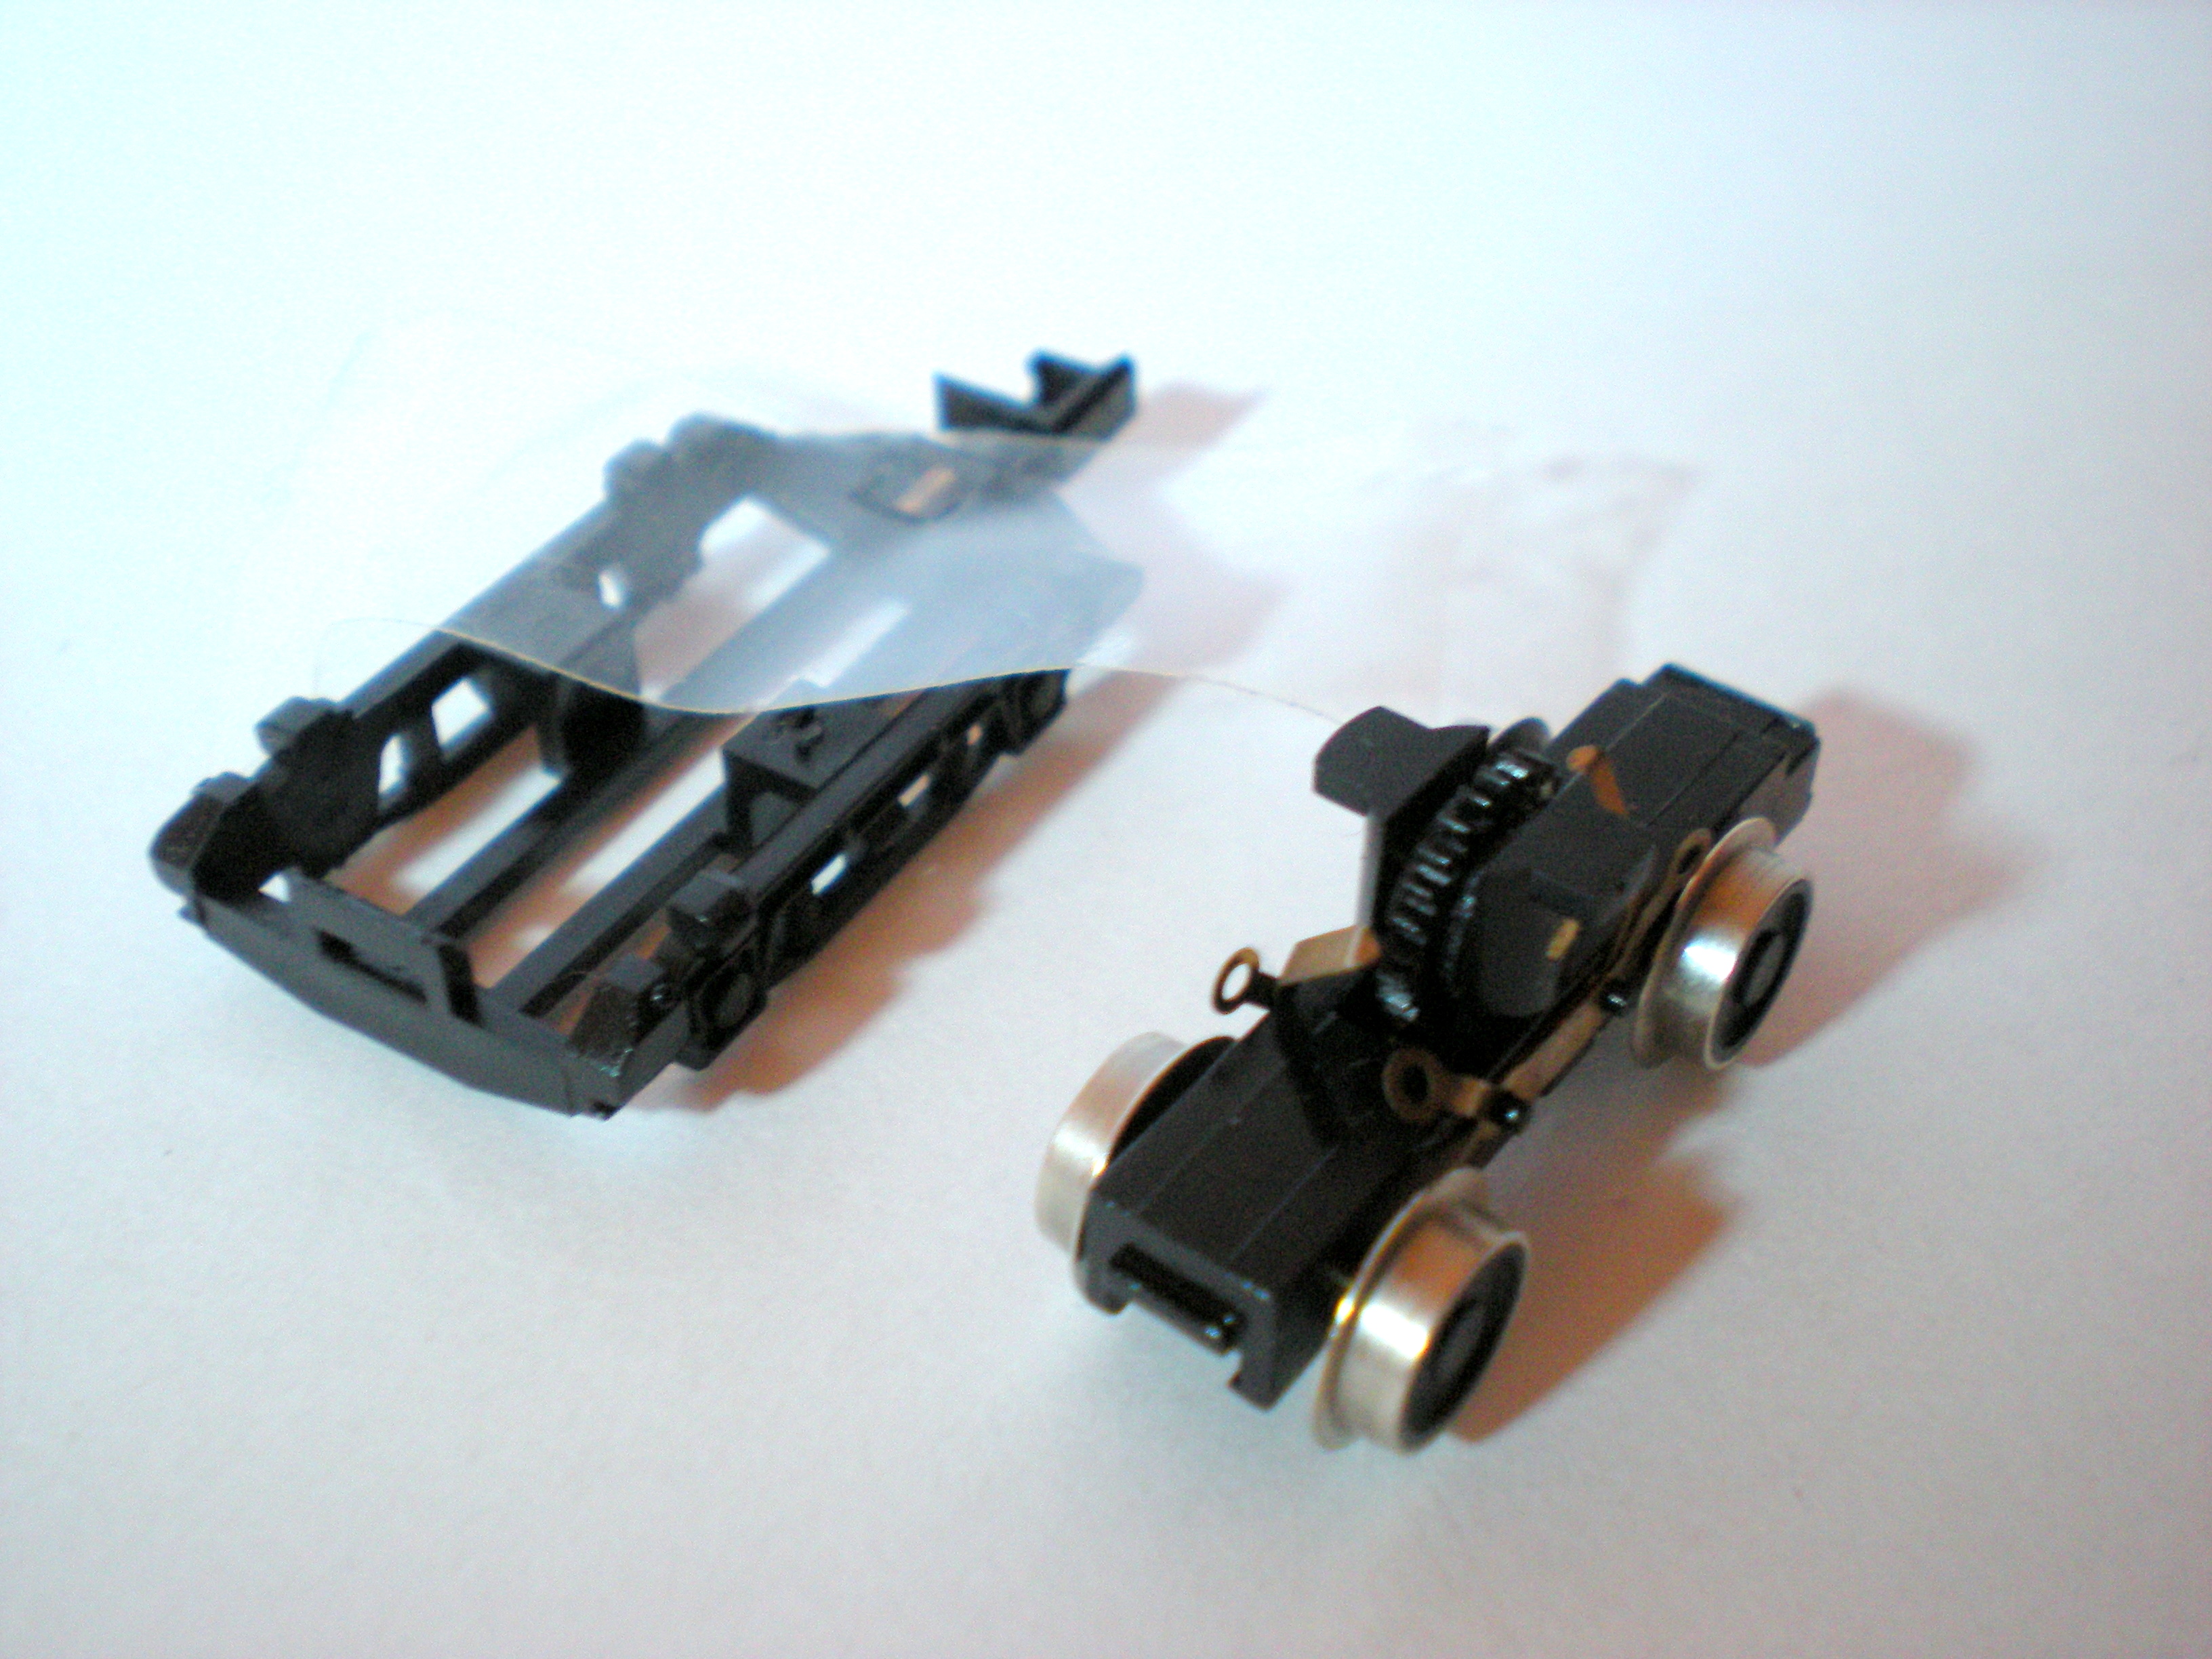
Each bogie has a slot at the back (see photo
above). This is what locks the bogie frame to the bogie itself.
Insert the screwdriver vertically between the plastic of the frame
and the plastic of the bogie and gently twist. This will force the
frame away from the bogie and it will eventually detach.
Take the frame away from the bogie. This exposes
the coupler spring, which is when it's likely to make a dash for
freedom. This is why the plastic bag is so vital. The
wheels are fairly secure in the bogies so they won't fall out. Once
you have the coupler spring safely to one side, you can dispense
with the plastic bag until it comes to reassembly.
If the spring somehow remains in place, a piece of
tape will help it stay there.
Now you can dissemble the bogie itself.
Starting with the back wheels, ease each axle out
of the frame. The axles can be pushed to one side a little so that
part of them is exposed and can be pushed out with a careful finger.
Don't be afraid of applying a little firm, steady force here, as
long as you have a firm grip on the frame itself. The bogie's
plastic body is fairly flexible, so you're unlikely to damage it.
The brushes will fall out of their own accord so
you might want to save them the bother and remove them all.
Carefully store all the disassembled bits in the
right order.
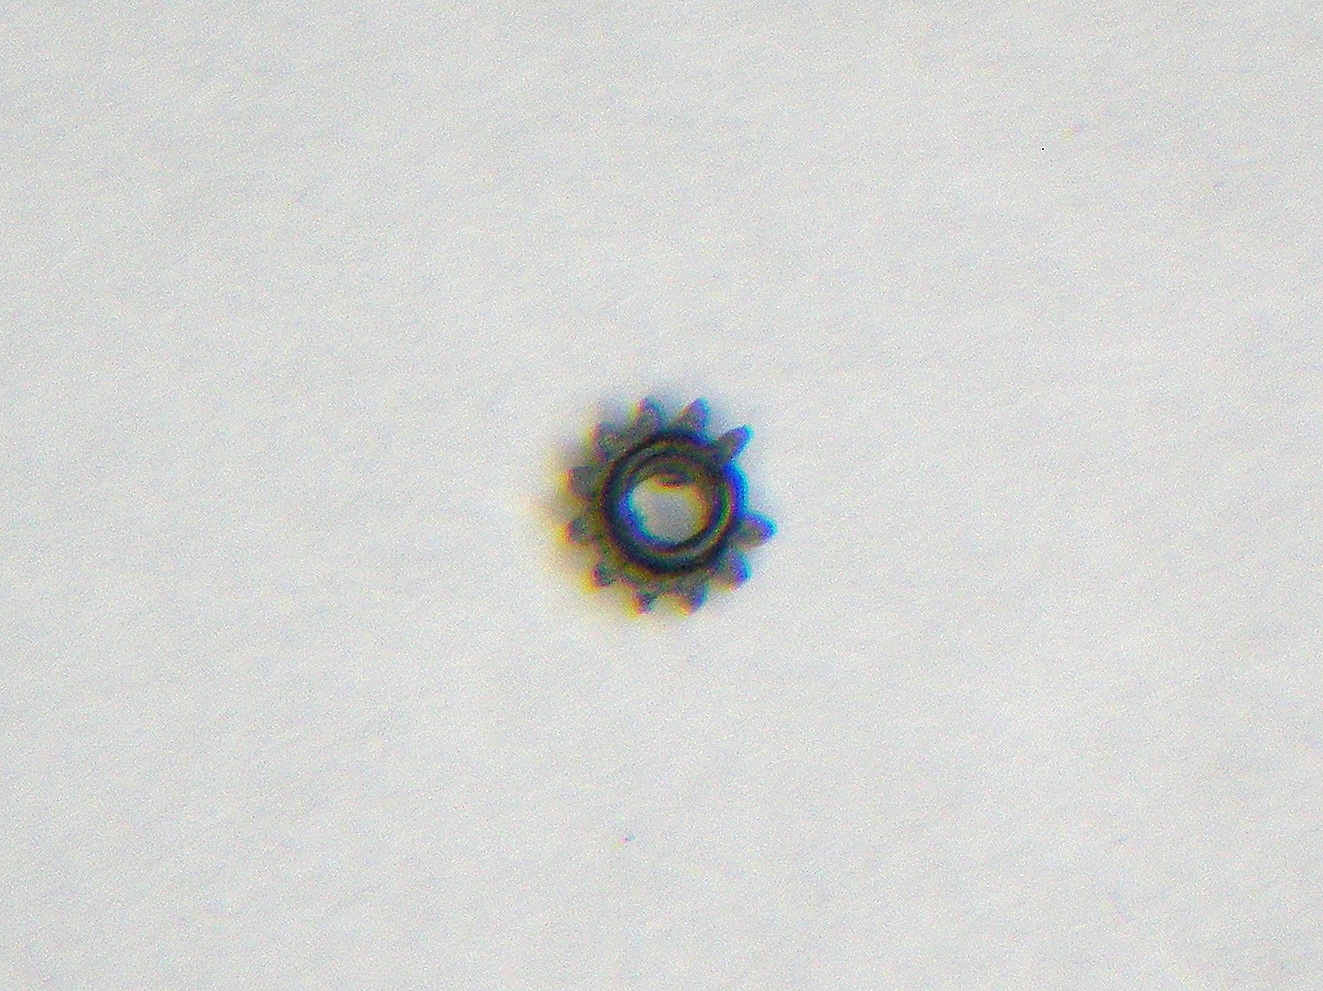
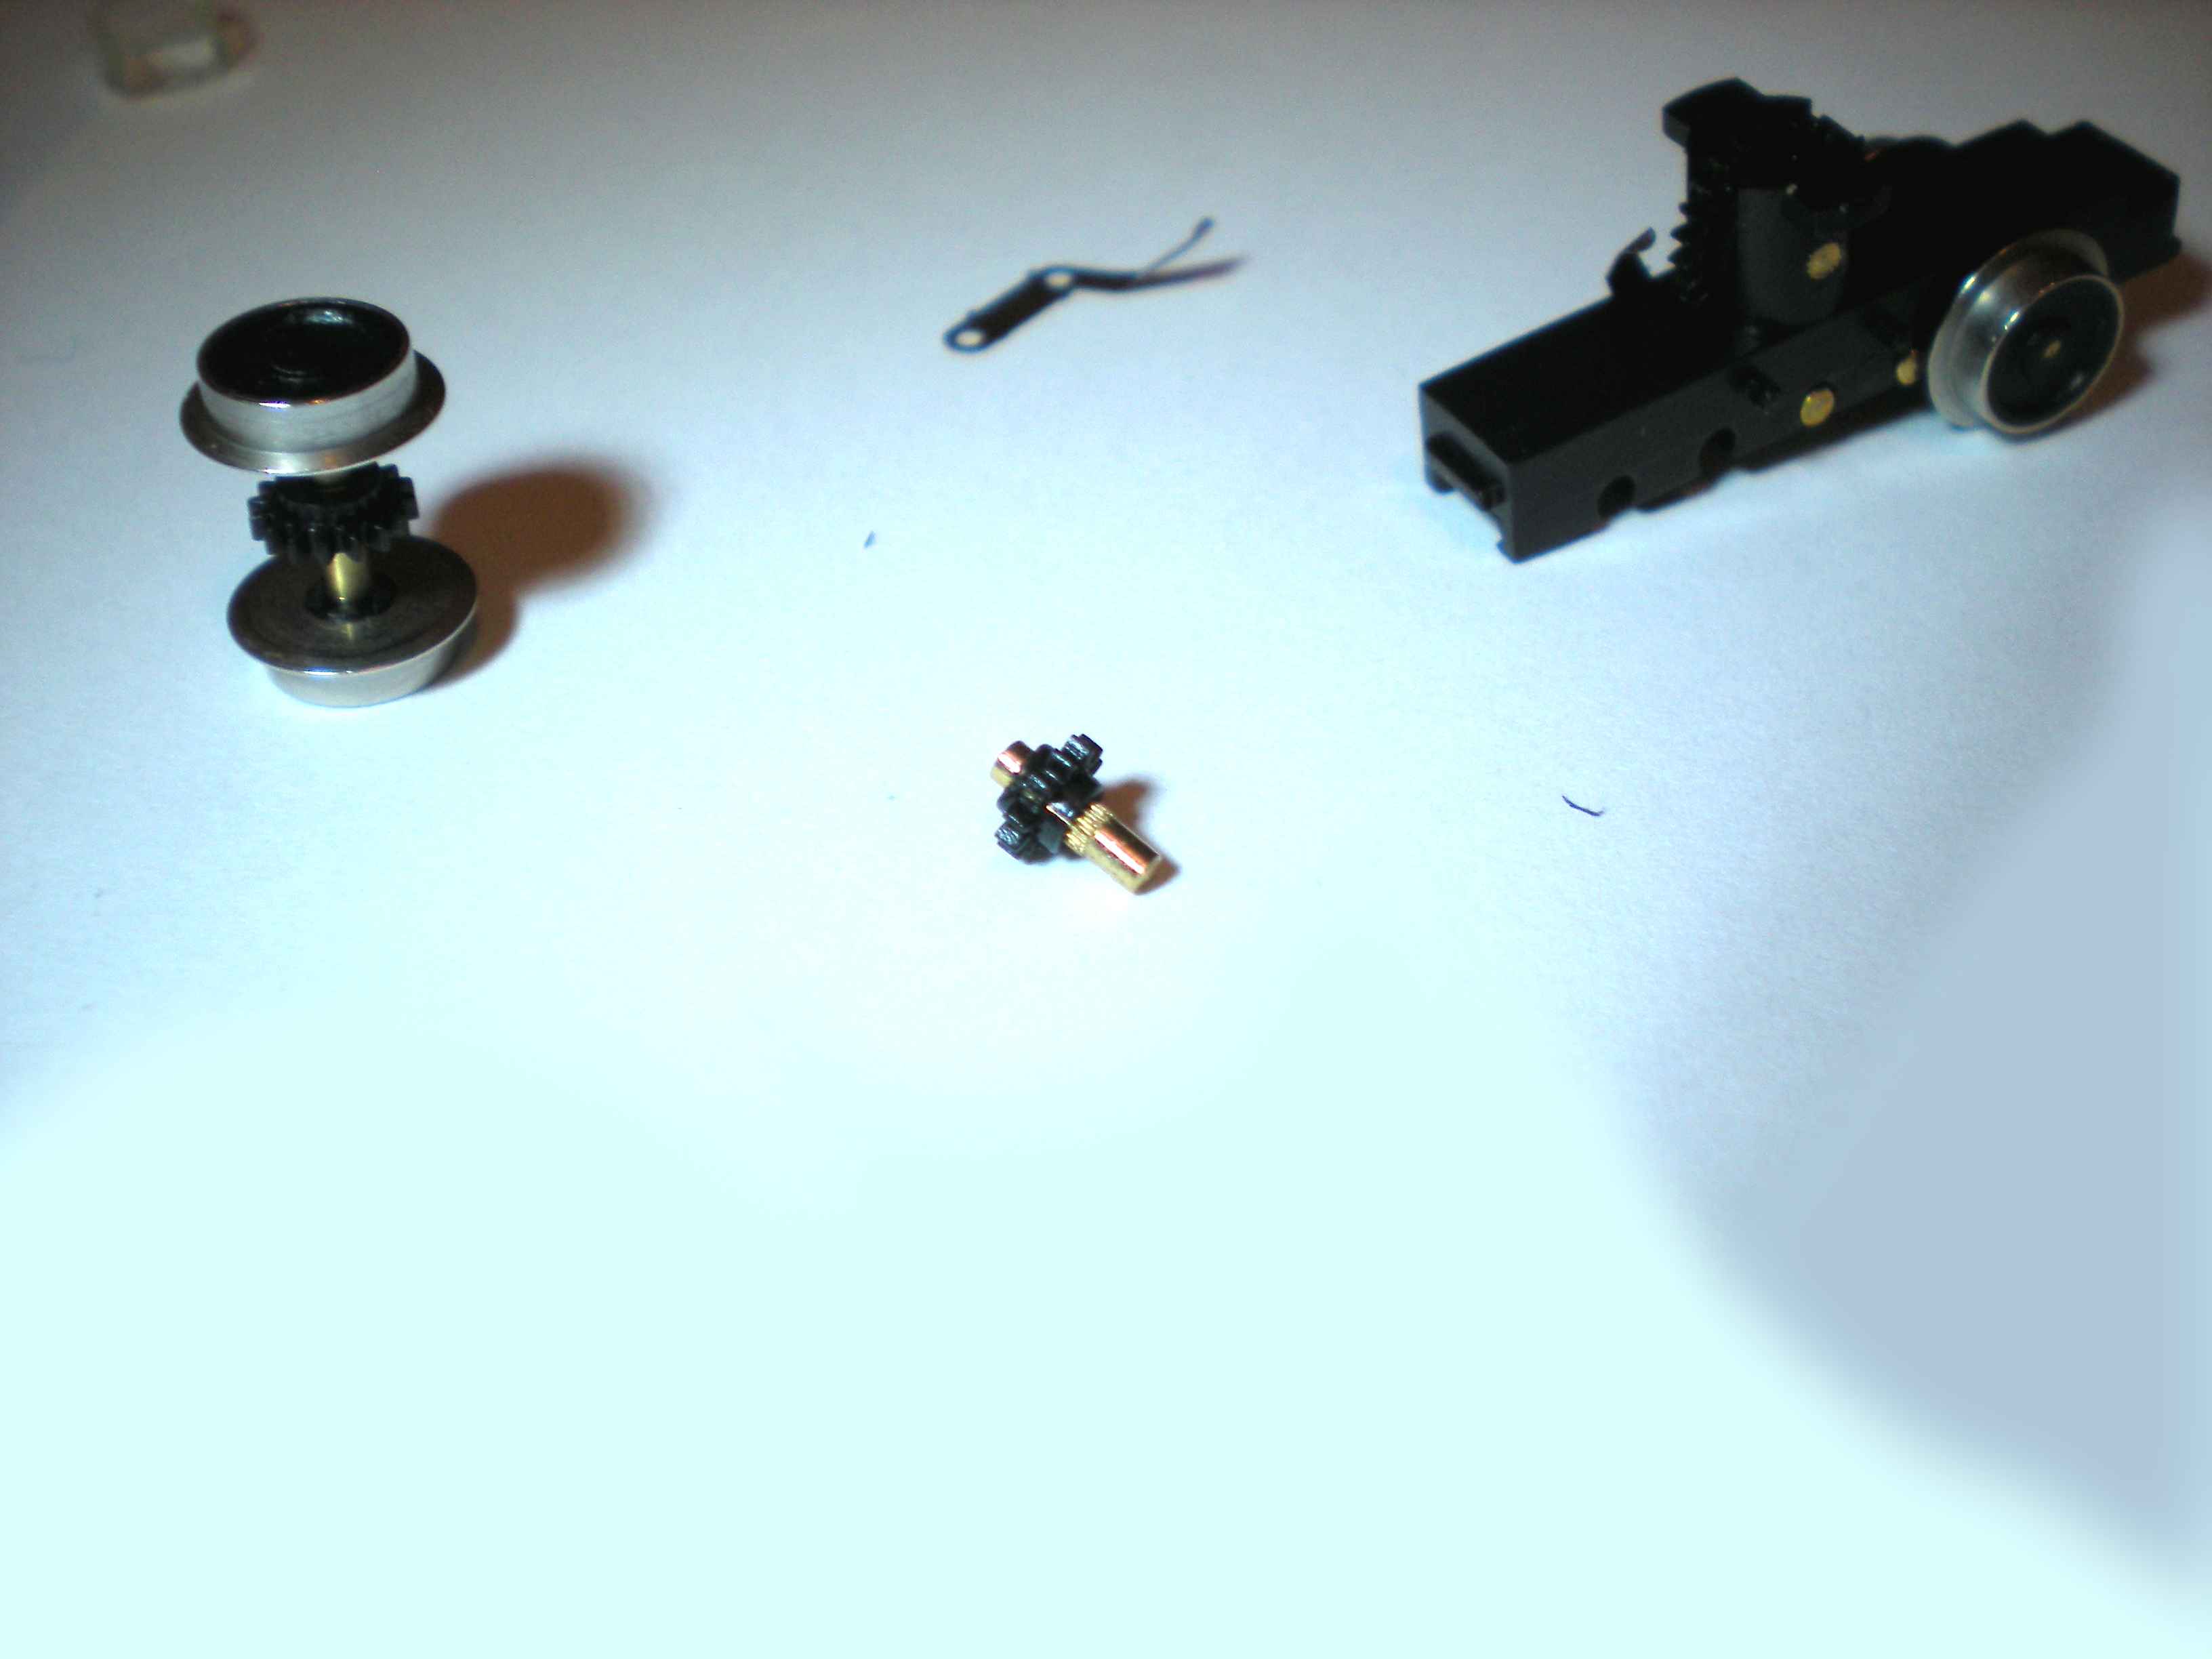
As you take off each of the axles, test the gear. A
good set of long-nosed tweezers is handy for this stage. If the gear
moves sideways or rotates while the axle is held firmly in place, then
the gear is split. Sometimes you can clearly see the split, and sometimes
you cannot, but it's there.
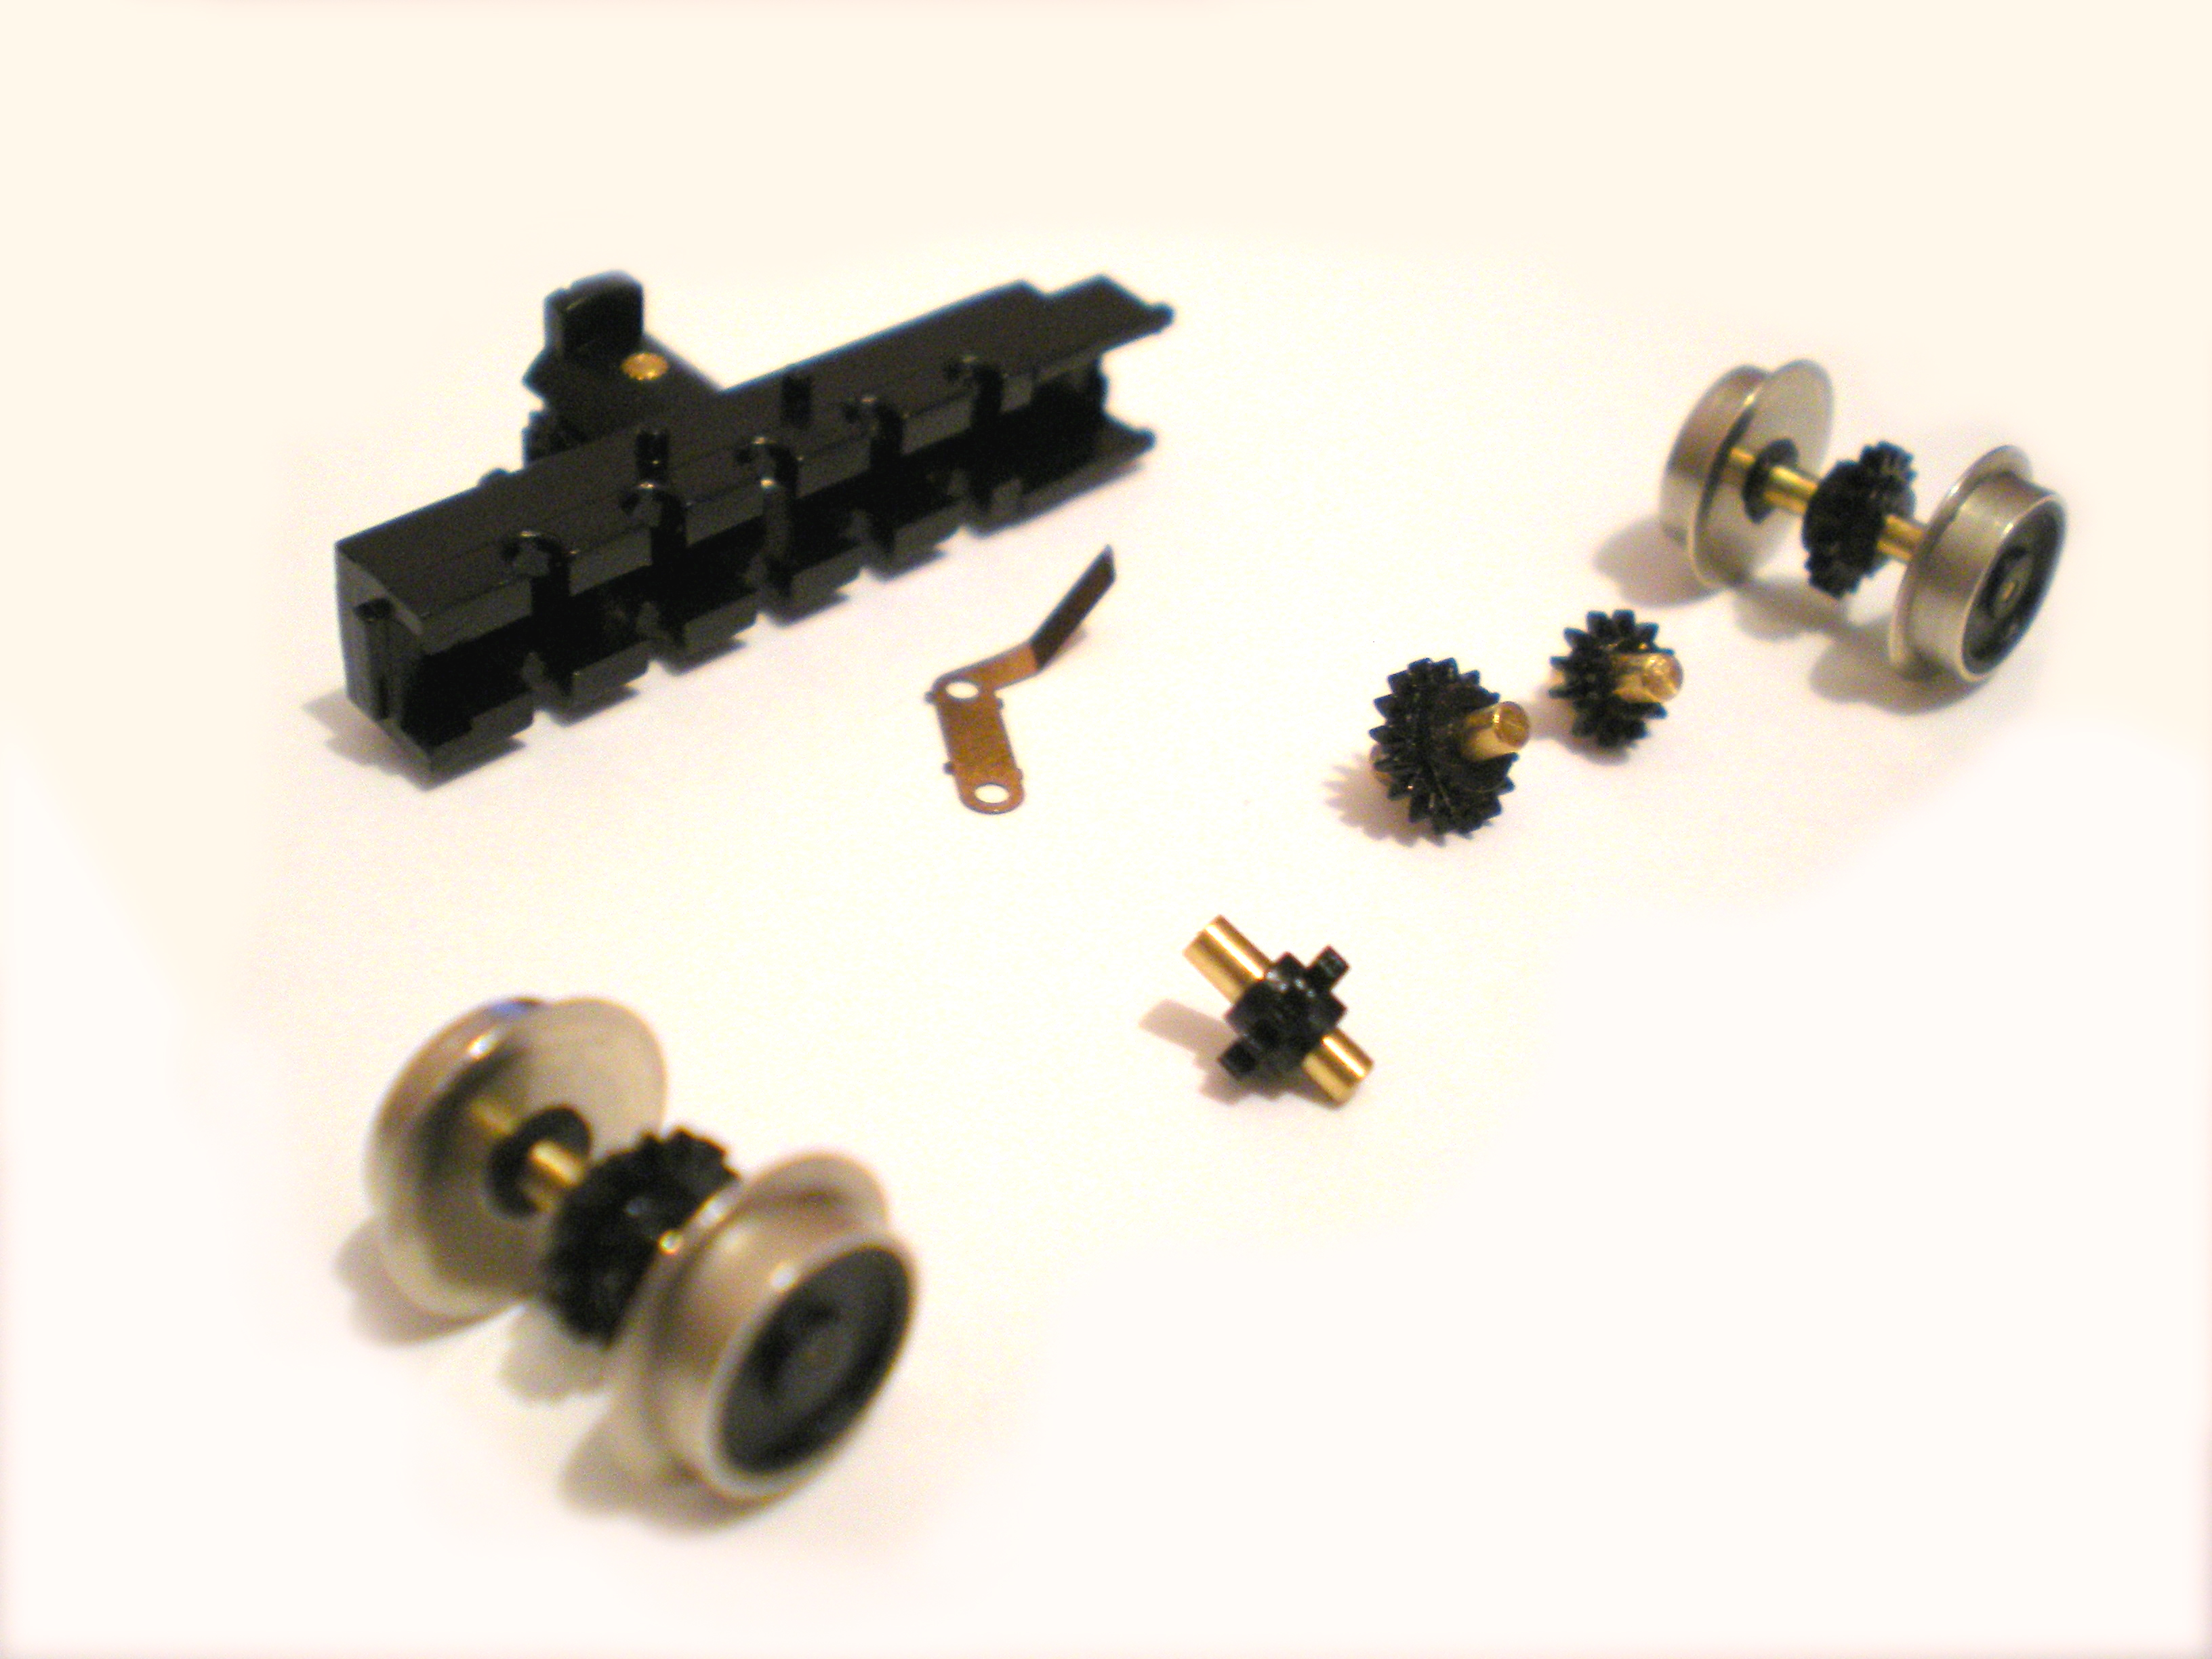
The gears shown above are 12-tooth (nearest each of
the wheelsets) and 16-tooth (in the centre), and this is the order in
which they sit on the bogie.
If any of the gears can easily be slid off the axle,
then you definitely know it's a goner. Replace the gear. It's also a
very good idea to replace the wheelsets, especially if you're working
on a Poole-era Graham Farish loco. You'll be able to exchange the shiny
pizza-cutter wheels with the new-standard, darkened, smaller profile
wheels, and as they're relatively inexpensive, you can get them at the
same time as you order your replacement gears.
Having presumably identified which gear was the
problem one on this particular bogie, I put the other axles and wheels
back in place, starting from the back and using the other bogie to help
identify which way round each axle was supposed to go.
That done, I tried rotating the bigger gear on
top of the frame to see if it would go round smoothly now. It did,
mostly, but continually stopped every rotation or so. With a bit of
force it would start again, but the same block was there on each
rotation.
The same effect could be seen when turning the back
wheels. The cogs all went round in unison but there was still a
point at which something got stuck, and it took a bit of force to
push through it. That meant more than one split gear.
To try and narrow down which of the remaining
gears it was, first I took off the wheels at the coupling
end of the frame (the rear end, as far as this guide is
concerned, as this is usually the far end of the frame in the
photos).
I tested the gear on the wheel axle by hand and it
seemed okay. I fitted the front wheels into the same rear slot on
the frame and the same sticking action was still there. So the wheel
axles were probably innocent.
Taking the wheels out again, I tested the top gear,
with just the central drive gear below it and one of the idler gears and
its axle sitting between the drive gear and the rear wheels. Still
sticking, so it had to be one of these two. I removed the idler gear's
axle and took a closer look at the gear. Although it seemed okay at
first, I was able to grip it and start sliding it around on the axle,
so this must be the one.
That meant that both of the minor gears on this
bogie were split. It seemed likely that others were too, or could go
the same way sooner rather than later, so the best solution was to
replace them all, and also to replace the old Poole-era shiny wheels
in favour of newer Bachmann wheels. Not only would the bogie look
much better all round, but I would be spared the rather complex task
of disassembling and reassembling the wheelsets with limited tools and
checking back-to-backs to ensure proper running.
(See additional section, below, which covers replacing
gears on an existing wheelset.)
Go to Replacing
Wheelsets >>
It seemed to be safe to assume that the bigger
25-tooth gears, the single gears that sit on top of the bogie, were
okay. Replacements in this case were not needed.
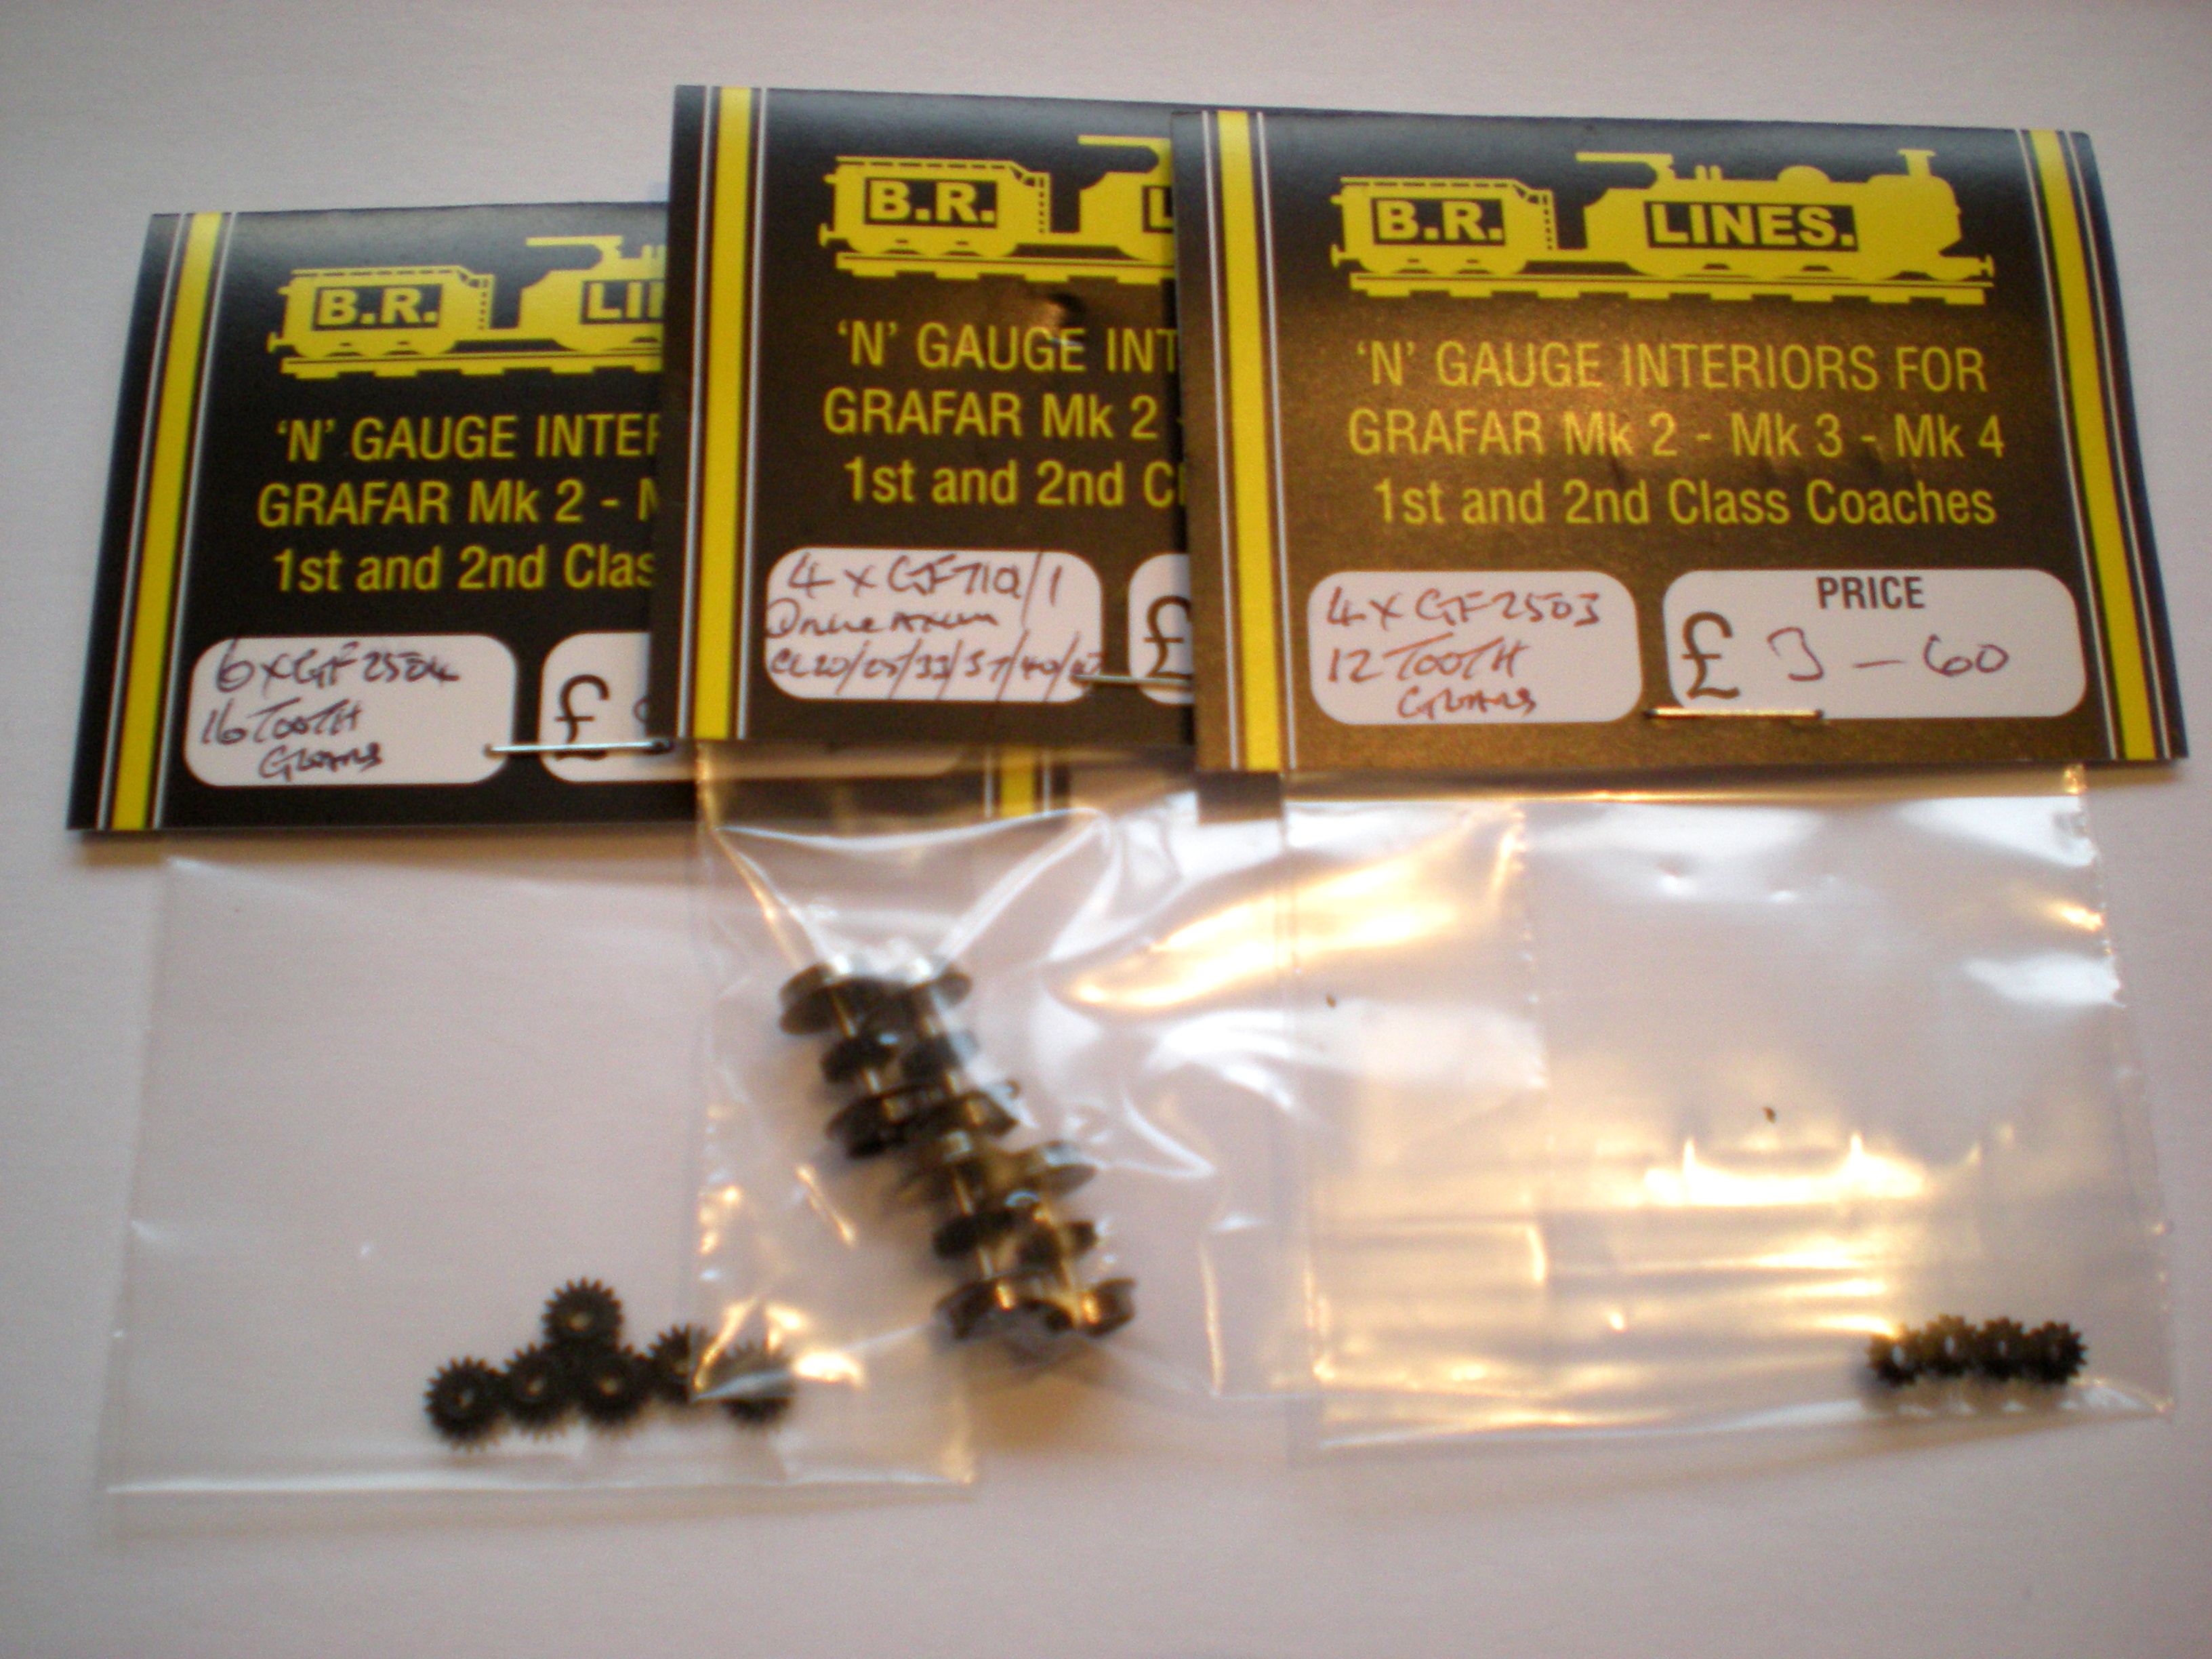
The items I needed for a complete upgrade were as
follows, all from BR Lines:
- GF7101-1 - Drive Axles (Bachmann Type) for Class 20 x 4
- GF2503 - 12-tooth Gears (pack of 4 latest, thicker gears)
- GF2504 - 16-tooth Gears (pack of 6 latest, thicker gears)
The replacement parts soon arrived from BR Lines,
and I had a pretty informative chat with Bob himself when placing
the order. A very knowledgeable chap!
I knew what my evening's work would consist of...
The next trick was to get the new gears on the old
axles. The Bachmann Chinese 12-tooth idler gears (the only ones that
are now available) are wider than the Poole-era gears and, unlike the
larger 16-tooth axle gears, can be fiddly when placing them on the
axle shafts.
When replacing any gear, you're advised not to use
force, otherwise you may inducing stresses that will lead to another
split quite soon. However, that leads into the reaming debate, which
may or may not be necessary (see boxout, below).
[To ream or not to ream, that is the
question] Reaming involves placing the appropriate tool into
the central axle hole in each gear and shaving off a little of the
plastic so that it will fit much more easily onto the axle. The tool
required is a cutting broache, a very popular tool with guys who
scratchbuild etched brass kits.
However, not everyone is convinced that the gears need to be
reamed at all, so this seems to be one of those situations in
railway modelling where it's really down to individual
preference. General consensus seems to be that reaming isn't
essential but it can reduce the chances of a repeat split.
One expert in the field certainly does strongly suggest that the
reaming is absolutely essential, as placing the replacement gear
under any stress while fitting not only deforms the gear,
thereby altering the tooth spacing (sometimes unequally), and
swelling the gear to a different size but can also cause the
gear to split immediately (seen at first hand). His suggestion
is never to use a drill. Instead always use a rat tail file or a
diamond reamer that is an abrasive not a cutter. Broaches are
poor for this type of work as they are for use on metal and just
weaken the gear. Gears should be reamed so that they are a
gentle, easy push-on fit - there must be some tightness to
transfer the drive. |
|